April 2026
April 2026
Admin Dashboard, Project Onboarding, and Enhanced MCP Tools in the IDE
The April 2026 release introduces a more streamlined way to stay updated, with a new in-app Change Log available directly within the platform.
For admins, this release brings a centralized Tenant Dashboard and a redesigned Project Onboarding flow, making it easier to configure SCM, environments, variables, and governance in one place during project creation. Existing tools like the Project Dashboard and setup guides continue to support ongoing project health, team management, and environment configuration.
Plan and Deploy capabilities have been expanded to Azure, allowing teams to configure service principals and run plans and deployments for Azure appStacks directly from the UI, alongside existing support for AWS and GCP. Snapshot, environment, and state backend tools for the Model Context Protocol (MCP) further strengthen the connection between the UI and your IDE.
Developers will notice several usability improvements, including variable renaming in the Topology canvas, automatic scrolling to attribute errors, tenant and project-level Preferences UI, module restriction policy versioning, clearer topology import errors, and improved discoverability of keyboard workflows through command palette hints.
Explore the sections below to see what's new, enhanced, changed, and fixed, and how these updates make building and managing your infrastructure more intuitive.
What's New
In-App Change Log
Click to view
We now support an In-App Change Log so you can see what shipped in recent releases without leaving StackGen UI. A dedicated What's New entry in the UI lets you hover over for a quick highlight of recent work, or click to open a full summary of features, enhancements, and fixes from the latest release.
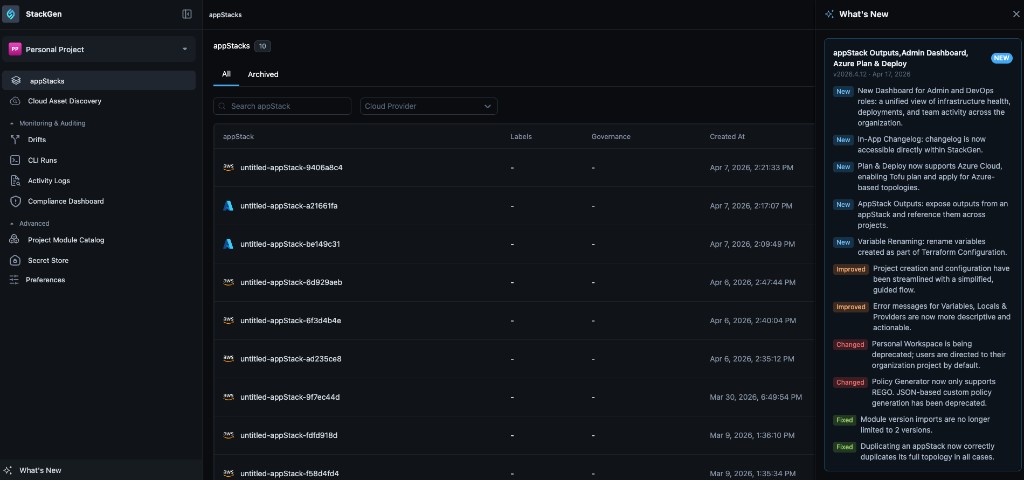
Why It Matters
As StackGen moves to a faster weekly release cycle, the Change Log gives every role immediate visibility into new capabilities and fixes, without relying on external resources or marketing emails.
Read more in Understanding the StackGen UI.
Preferences UI and IaC defaults
Click to view
We've added a Preferences UI so you can manage settings in the interface that previously required the CLI. The Preferences feature is released behind a feature flag, so your organisation can enable it when ready. After opening the new UI, you can manage tenant-level defaults and project-level values in one surface instead of splitting work between the terminal and the application.
Key Features
- IaC directory - Change the default IaC directory name (for example from Terraform to TF). Saving the preference updates how related files are rendered for appStacks in that scope right away.
- Preference hierarchy - Project-level values override matching tenant-level defaults. Enablement walkthroughs show the same setting at both levels so you can see which value wins before you rely on it in plans or exports.
- Compliance and naming - Manage compliance export and directory naming preferences in the UI rather than only through external tools or scripts.
- The Preferences entry point and layout in this release are temporary. The product is expected to move Preferences under Project Settings in a future release, so expect navigation to change when that ships.
-
When an Admin or DevOps user changes tenant-level preferences while the UI is scoped to a specific project, a new warning appears so you do not treat the edit as project-only. The full behavior is documented under What's Changed in Tenant-level preference warnings below.
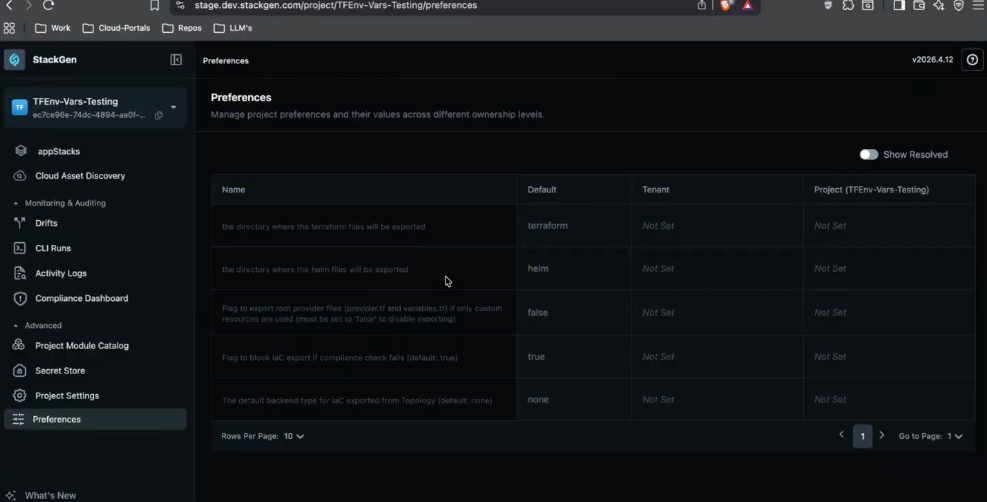
Why It Matters
Teams can standardize naming conventions and compliance settings across different projects without jumping to the terminal, ensuring a more consistent and automated workflow across the platform.
Read more in Preferences in StackGen.
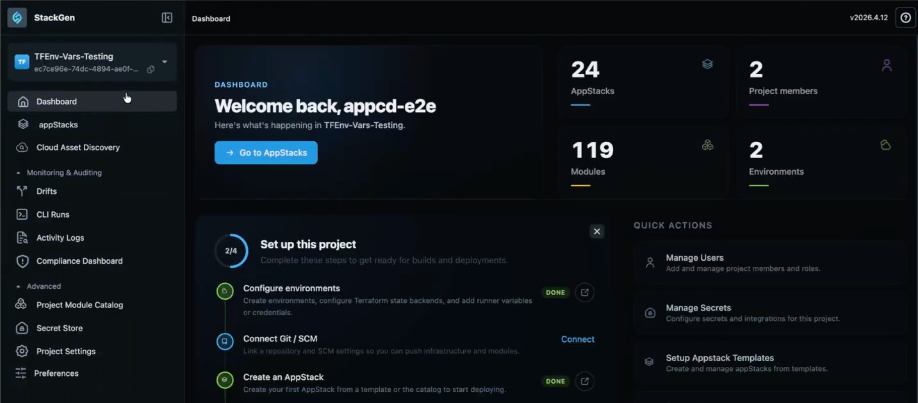
Tenant dashboard and setup guides
Click to view
We've added a Tenant Dashboard so Admin and DevOps users see a clear landing view when you sign in, whether it is your first visit or you are coming back to the product. Both the Tenant and Project dashboards include a toggleable setup checklist; this section covers tenant-wide metrics and the tenant checklist. For appStack counts, environment setup, and the project-tailored checklist, see Project dashboard and setup guides below.
Key Features
- Organization metrics - See live counts for projects, members, governance, and onboarded modules on the dashboard cards.
- Toggleable setup guide - Step through first-time work such as creating projects, inviting members, and onboarding a module without losing your place.
- Interactive links - Cards and checklist items take you straight to the right pages (Members, All Projects, Enterprise Module Catalog, and related areas) so you are not hunting through the sidebar.
- Setup guide control - Dismiss the checklist when you are done, or use Restart setup guide when you want to walk through onboarding again.
- For some accounts the dashboard is still reached from Settings today. The product team expects to change how and where you open this view in a future release, so treat the entry point as temporary the same way Preferences placement is called out above.
-
Project admins and DevOps also get a similar dashboard at the project level, with metrics and steps scoped to that project.

Why It Matters
You get one place to see how the tenant is doing and to finish baseline setup, with links that drop you on the right management screen for each task.
Read more in Understanding the StackGen UI.
Project dashboard and setup guides
Click to view
We've introduced a dedicated Project Dashboard for project admins and DevOps so you can see project-specific health and finish late-stage setup in one place. Developers do not see this dashboard, so they stay focused on topology and code. For organisation-wide metrics and the tenant checklist, see Tenant dashboard and setup guides above.
Key Features
-
Role-based access - The dashboard is available only to project admins and DevOps. Developer users cannot open it, by design.
-
Project metrics - Live counts for appStacks, project members, onboarded modules, and environments reflect the project you have selected.
-
Interactive links - Metric cards act as shortcuts into the right surfaces; for example member counts lead to project settings and members, and environment metrics link into environment configuration.
-
Toggleable setup guide - Same pattern as the Tenant dashboard: a checklist for integrated onboarding (for example configure environments, connect Git or SCM, create an appStack). If you finish Project Onboarding but skip steps such as SCM or variables, the guide keeps prompting you until you complete the work or dismiss it. Close it when you are done, or use Restart setup guide when you want to walk through initialization again.
-
For organisation counts and the tenant checklist, see Tenant dashboard and setup guides above.
Why It Matters
You get one view of how the project is doing, with links that take you straight to members, environments, and related setup, and a setup card that nudges you when anything is still unfinished after onboarding.
Read more in Understanding the StackGen UI and Create a Project with Guided Onboarding.
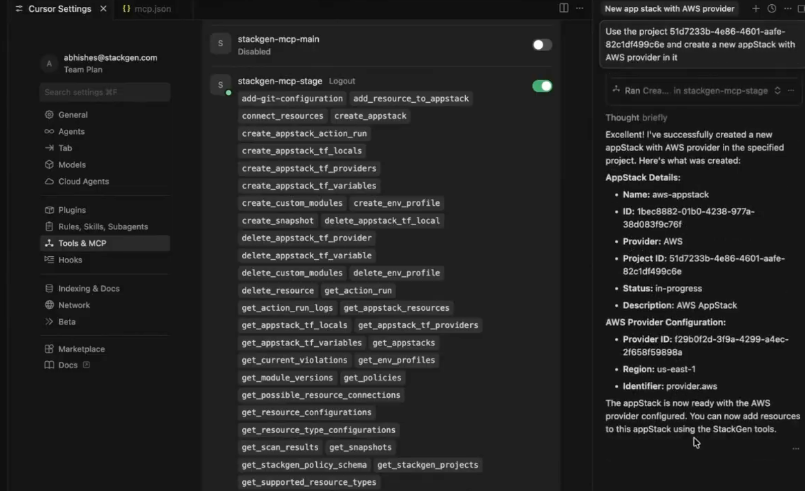
MCP snapshot support
Click to view
We've added MCP tools so you can create or restore appStack snapshots from your IDE while an assistant helps you edit appStacks. In Tools & MCP you will see actions such as get_snapshots and restore_snapshot next to your other StackGen tools.
Key Features
-
Create and restore - Ask the assistant to take a snapshot or restore a snapshot while you stay in the editor.
-
Manual prompts - The UI still takes snapshots automatically where that already applies. Over MCP, you choose when to snapshot so long assistant runs do not advance without a save point you picked.
-
Rollback for AI edits - If a big batch of assistant changes is wrong, you can go back to a snapshot instead of untangling the diff by hand.
-
Delete snapshot is not supported via MCP - Delete snapshot is only available in the main StackGen UI, not through MCP, to prevent accidental deletion of snapshot history through chat workflows.
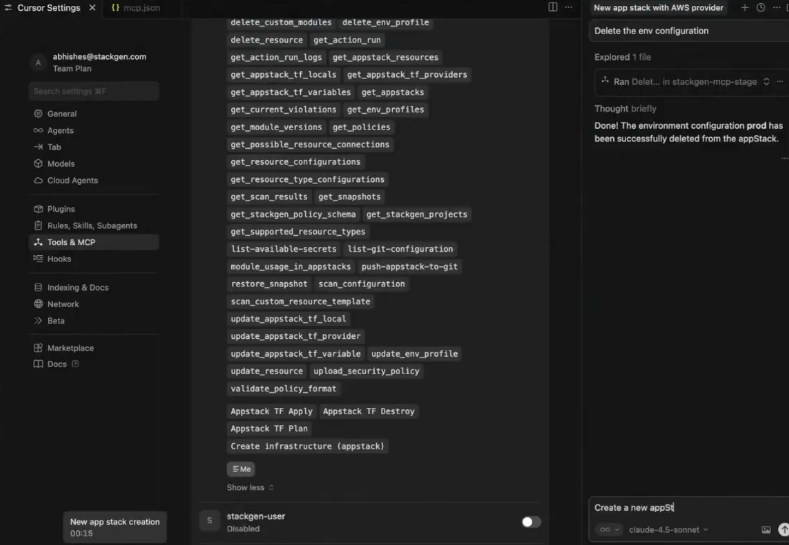
Why It Matters
You keep rollback close to assistant-driven edits in the IDE, while destructive cleanup stays in the UI where you already confirm risky work.
Read more in appStack Snapshots and StackGen MCP.
MCP environment and state backend tools
Click to view
We've added MCP tools so you can add or remove environment configurations and S3 state backends from your IDE with the same assistant you use for appStacks. That matches the StackGen interface you need before plans and deployments run, instead of reserving that wiring for the browser alone.
Key Features
-
Profiles and backends - Prompt for changes such as add an environment configuration with an S3 state backend; tools like
create_env_profileanddelete_env_profileperform the work from the MCP list. -
Plan and Deploy parity - IDE-driven setup aligns with the requirements for running infrastructure plans and deployments.
-
appStack scope - Updates apply to the appStack you are in, not to whole-project defaults, which is how environments are modeled today.
Why It Matters
You configure environments and backends from chat in the IDE, and the appStack Environments view updates the same way it would after a UI change, so teammates still see one shared picture.
Read more in Environment Configurations and StackGen MCP.
Azure Plan and Deploy support
Click to view
We've expanded built-in Plan and Deploy to include Azure alongside AWS and GCP. You configure an Azure service principal in StackGen, follow the side panel for the Azure portal values you need, then run plans and deployments for Azure appStacks through the same UI flows you already use for other providers.
Key Features
-
Azure service principal - Add credentials Plan and Deploy needs from the UI, including CloudProvider: Azure (service principal) when you create a secret under Settings > Secret Store > New Secret.
-
In-product guidance - The side panel lists the Azure portal steps to collect fields such as Client ID and Tenant ID next to your StackGen work.
-
End-to-end workflow - After the principal is saved, run the full plan and deploy cycle for Azure resources inside StackGen like you do for other clouds.
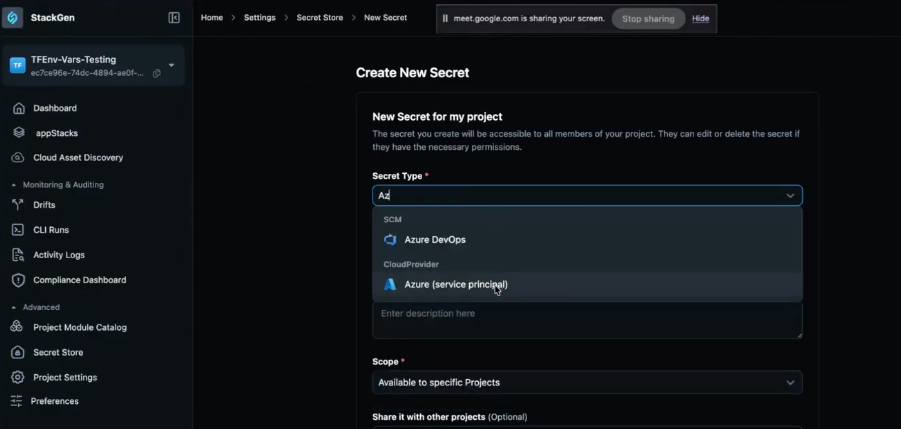
Why It Matters
DevOps teams get the same Plan and Deploy experience for Azure that they already rely on for other major providers, without maintaining a separate workflow just for Azure infrastructure.
Read more in Plan & Deploy.
What's Enhanced
Module restriction policy versioning
Click to view
The Module Restriction Policy UI has been enhanced to support version-based governance for modules.
Key Changes
-
Restructured policy UI - Module version controls now live in a dedicated part of the Module Restriction Policy screen so version work is not buried with unrelated fields.
-
Version bounds - Set an allowed band for a module (for example 1.0 through 2.0). Anything outside that band is out of scope, including versions below the lower bound, not only releases above the upper bound.
-
Governance blocking - If someone tries to switch a module to a version outside the configured range, the UI blocks the change and surfaces a governance or restriction policy notification instead of letting the save go through quietly.
-
Contextual feedback - The message calls out the version bounds on the policy so the user knows the block comes from the rule you set, not from an unrelated error.
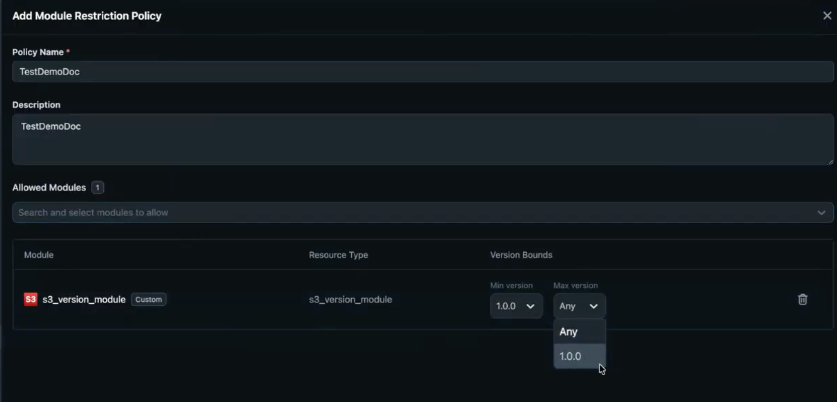
Why It Matters
Platform teams can keep module upgrades inside an approved band, and everyone else sees exactly why a version pick was rejected before it reaches plans or deployments.
Read more in Custom Policies.
Project onboarding flow
Click to view
We've enhanced project onboarding so project creation is a guided onboarding flow with clear steps instead of a single short form. You still name the project up front, but the wizard also walks SCM, environments, governance, and a final summary so the project is usable and governed as soon as you finish, not only after a round of follow-up fixes.
Key stages
- Project details and members - Capture name, description, and who should have access while you are still in the wizard.
- Git / SCM configuration - Connect repositories and IaC export defaults when your organisation is ready to wire source control in the same flow.
- Environments and variables - Define environments (for example QA), their variables, and related pieces such as state backends and credentials plans and deployments will need.
- Governance - Attach the governance choices that should apply to this project before you leave onboarding.
- Summary - Confirm the setup and continue into the project.
Key Features
-
Prefill from another project - Use Prefill from another project (optional) to pull members, Git defaults, governance, and environment names from a source project. For Apply copy and how values map into the draft, see Copy project settings (Prefill).
-
Skippable optional steps - Optional stages such as SCM or governance can be skipped when you want to move faster; you can finish them later from the Project Dashboard instead of blocking project creation.
-
Dashboard handoff - When the flow completes you land on the Project Dashboard, where the setup guide helps you restart or finish anything you skipped (see Project dashboard and setup guides).
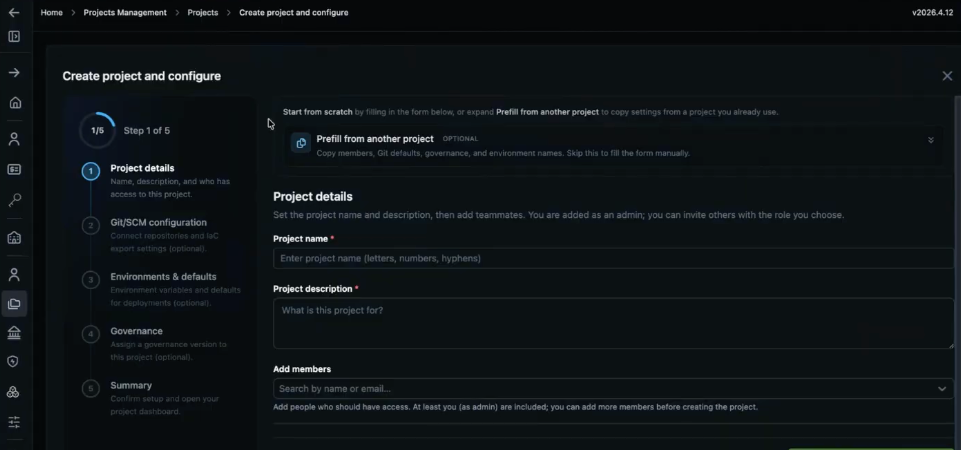
Why It Matters
You capture project setup in the wizard instead of deferring all of it until after the project exists, so you spend less time redoing the same configuration work in the first days of a new project.
Read more in Create a Project with Guided Onboarding.
Copy project settings (Prefill)
Click to view
We've enhanced the first step of project onboarding with optional Prefill from another project. You can replicate settings from a source project you already run, choose Apply copy, and let the wizard fill SCM, environment names, variables, members, and governance into the draft while everything below stays editable. For the full step list, see Project onboarding flow.
Key Features
-
Source project selection - Use the Source project control to search or pick the project whose configuration you want to duplicate before you move on.
-
Apply copy - Apply copy applies the source project data into your new project setup so you are not retyping the same baseline fields by hand.
-
Flexibility - Edit any prefilled value, leave prefill unused, or exit and start over from scratch if you decide you want a clean manual pass instead.

Why It Matters
You can stand up a new project that matches an approved pattern much faster when it should mirror an existing project, without giving up control over individual fields after the copy.
Read more in Create a Project with Guided Onboarding.
Copy Vault secrets (UUIDs)
Click to view
We've enhanced Secret Store with a copy control on each secret row so you can grab the UUID in one click. On Internal Secrets under Settings, the icon shows a tooltip such as Copy Secret UUID next to the secret name.
Key Features
-
One-step UUID capture - Copy the exact id your automation needs without opening extra screens or retyping long strings.
-
CI/CD friendly - Paste the UUID into scripts, pipelines, or integrations that reference platform secrets by id.

Why It Matters
You spend less time connecting CI/CD and other tooling to the right platform secret, and you avoid transcription mistakes when ids are long or easy to misread.
Read more in StackGen Settings.
Automatic scroll to attribute errors
Click to view
We've enhanced the Topology side panel so Save does not leave you guessing when a validation error sits off screen. If the failing attribute is scrolled out of view, the UI now scrolls straight to that field so the problem is in front of you right away.
Key Changes
-
Scroll to the failing attribute - After Save, the panel jumps to the property that triggered the validation error instead of keeping it hidden above or below the fold.
Why It Matters
You fix bad values faster because you are not manually scanning a long attribute list to find what Save was complaining about.
Read more in Configure a Resource.
Variable renaming support
Click to view
We've enhanced variable editing in the product, including from the Topology canvas, so you can rename a variable in the UI instead of deleting and recreating it. This is currently limited support: the name change saves, but the platform does not automatically refactor the rest of the appStack.
Key Changes
- Rename in place - Open a variable, adjust its name (for example in Raw HCL inside the Edit Variable modal), and commit with Update Variable the same way you edit other Terraform-style definitions.
Known limitations
-
Manual reference updates - References elsewhere in the appStack still point at the old name until you update them yourself. There is no automatic find-and-replace yet, so you need to visit each use site and align it with the new name before you rely on plans or exports.
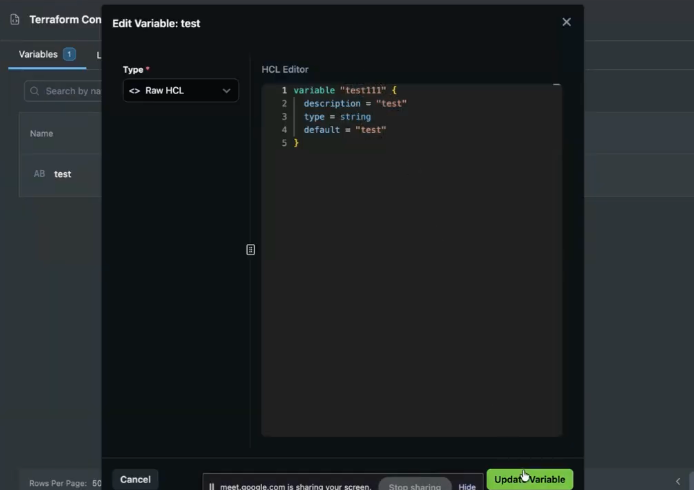
Why It Matters
You can correct or standardize a variable name early without tearing the object down, as long as you budget time to fix downstream references by hand until automatic refactoring ships.
Read more in Topology.
Default policy toggle for appStacks
Click to view
We've enhanced Create New appStack for Start from scratch with an Include default policies toggle (wording as shown in-product). It stays on by default so new stacks pick up the usual StackGen built-in policies, and you can clear it when you want a clean slate instead.
Key Features
-
Opt-out control - Leave the toggle on for standard governance, or turn it off so the new appStack is created without StackGen built-in policies attached, matching the helper text under the control.
-
Clean slate - With the toggle off, the Policies tab starts empty: no built-in platform defaults appear until you add your own policies.
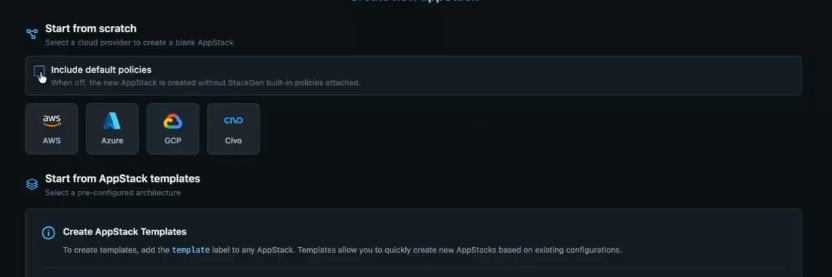
Why It Matters
Specialized appStacks can run under strictly custom governance from day one when you do not want the platform defaults layered in automatically.
Read more in IaC from Design.
Specific topology import error messages
Click to view
We've enhanced Topology JSON import error feedback. The flow used to stop on a generic internal server error when JSON referenced custom modules your project did not have. The UI now surfaces a failed to import topology style message that names the missing module and includes a Request ID when you need to trace the failure further.
Key Changes
-
Specific failure text - The toast spells out that the module used in the topology is missing (for example module does not exist language plus the concrete module identifier) instead of hiding the cause behind a generic server error.
-
Request ID - The same notification highlights a Request ID so you can correlate the attempt with backend logs or Support without guessing which request failed.
-
When you see it - This path usually appears when the topology references a module that is not onboarded to the project yet or was never imported into that project scope.
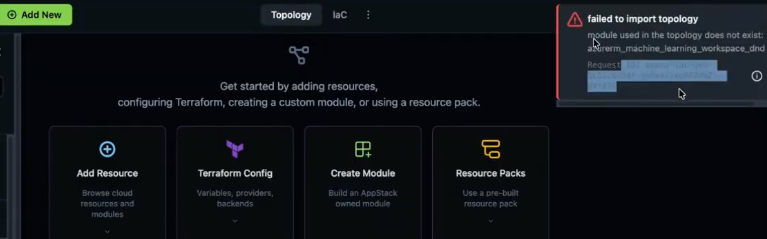
Why It Matters
You can see what to onboard or import next, then retry the JSON import, instead of opening a ticket just to learn which module name failed.
Read more in Topology.
Command palette menu hint
Click to view
We've enhanced discoverability for the Command Palette on Topology. Command+K (macOS) and Ctrl+K (Windows) were already there, but nothing on the canvas told you the shortcut existed. A small first-run style hint now surfaces after you sign in so new and returning users bump into the affordance without hunting through menus. This change affects only UX; functionality remains unchanged.
Key Changes
-
On-canvas hint - A floating bar on Topology (for example Quick actions with ⌘ K on macOS) points at the shortcut so you know where to start.
-
Dismissal - Use the x on the hint, or open the Command Palette successfully once, and the bar stays hidden afterward so it does not keep nagging you.
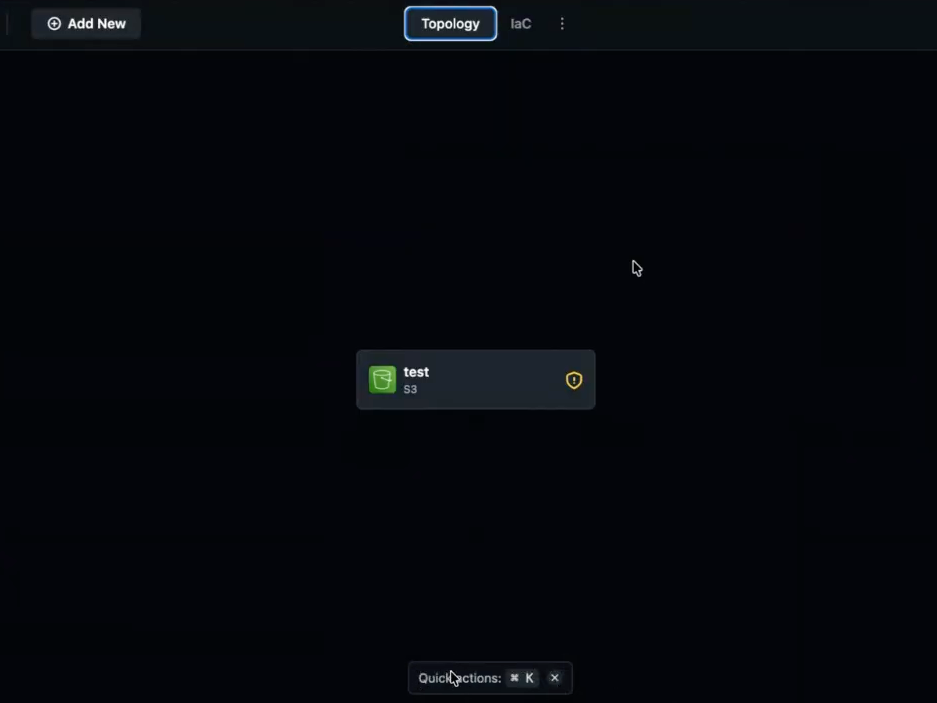
Why It Matters
You reach keyboard-driven actions on a large Topology canvas sooner, which saves time when you already rely on Command+K or Ctrl+K in other tools and expect the same here.
Read more in Topology.
What's Changed
Helm support visibility
Click to view
We have changed how Helm appears in the product. It is now on for all customers in this release.
Feature flag removed
Helm used to ship behind a feature flag for part of the rollout. That gate is gone in this build, so every tenant gets the same Helm behavior without waiting on a toggle.
UI labeling
The UI no longer breaks Helm out as its own standalone option or label the way it did before. Helm support stays active under the covers; only the explicit Helm surfacing in the interface was simplified.
Why It Matters
You keep Helm-backed flows without extra noise in the UI, and you no longer depend on a feature flag being flipped for your organisation before those paths work.
Developer role resource editing restrictions
Click to view
We have changed who can drive manual IaC edits from the Topology experience.
Icon visibility
For Admin and DevOps, the Files pane on Topology still shows manual actions such as Add File and New Folder above the file tree. Those IaC entry points are removed for Developer users in the same area, so they still open IaC files but do not get the add controls a privileged role sees.
Who can edit
Manual file and IaC edits from that surface stay limited to DevOps and Admin, which keeps ad-hoc additions with the roles that own platform standards.
![]()
Why It Matters
Manual overrides stay with Admin and DevOps, which protects the integrity of generated IaC and reduces the chance of unreviewed edits from Developer accounts.
Read more in Role-Based Access Control (RBAC).
Personal workspace removal
Click to view
We have changed how Personal Workspaces fit into the product. StackGen is moving away from them so day-to-day work lands in collaborative projects where governance, credentials, and team access already apply.
Access
If you still have appStacks in a personal workspace, you can open and manage them from the appStacks list. The Create / New entry for net-new work in that personal context is removed, so you cannot spin up another appStack there while the transition is in effect.
After the last appStack
When you delete the last appStack in a personal workspace, you are sent to the first collaborative project you can access, even when that project has no appStacks yet, so you land in a project dashboard instead of an empty personal shell.
Login
After you sign out and back in, you open on your primary project dashboard instead of the older personal-workspace-first landing pattern.
Known issue: Rapidly switching between a personal workspace view and a project dashboard can occasionally skip the expected redirect. Retry navigation or refresh if you appear stuck between contexts.
Why It Matters
Infrastructure work stays inside organisation and project boundaries where governance, credentials, and collaboration already apply.
Read more in StackGen Settings.
Tenant-level preference warnings
Click to view
We have changed tenant preference editing when you work inside a project. A warning now appears if an Admin or DevOps user edits a tenant-level preference while the Preferences UI is opened from that project context. That matches the Preferences UI work under What's New in Preferences UI and IaC defaults.
What you'll see
A confirmation modal such as Update tenant preference? appears before the save completes. It calls out that you are changing a tenant-level value from the project Preferences page, that the update applies to the whole tenant and not only the project in view, and asks you to confirm before you write the tenant-wide value.
Who can still save
Admin and DevOps users with permission to edit tenant preferences can still choose Save after they read the modal. The flow is preventative UX, not a hard block, so intentional tenant updates remain possible.
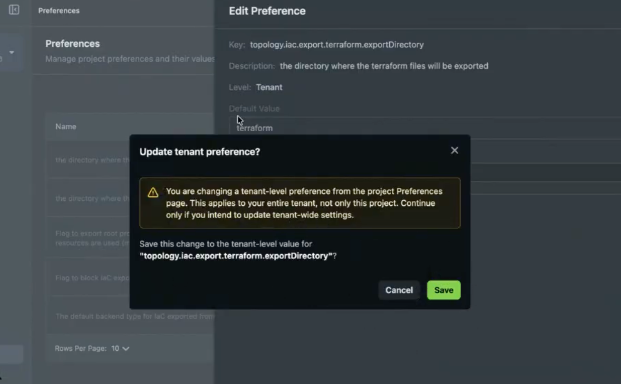
Why It Matters
You are less likely to apply accidental tenant-wide preference changes when you only meant to adjust project settings, while real tenant edits stay one explicit confirmation away.
Read more in Preferences in StackGen.
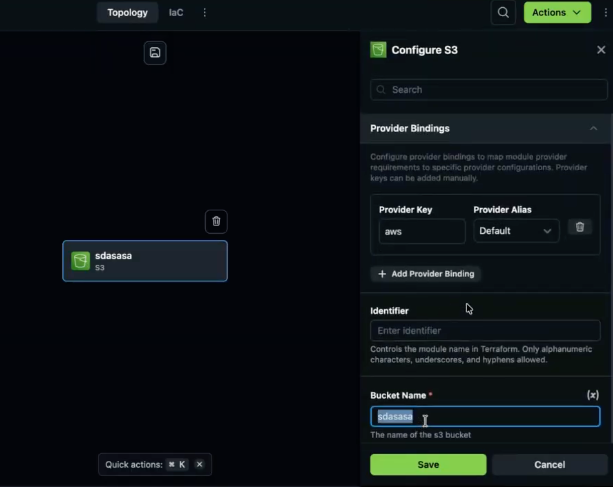
Conditional provider binding visibility
Click to view
We have changed when provider bindings appear in the Topology side panel so the UI stays lighter unless you actually need that control.
Before
Provider bindings used to show in the side panel even when you had not added a Terraform (TF) blocks provider on the appStack, which added noise while you were still wiring basic modules.
When it appears
The Provider bindings section stays hidden until you add a TF blocks provider (for example AzureRM or AWS) on the appStack. After that, the section expands so you can map provider keys and aliases the way the module expects.
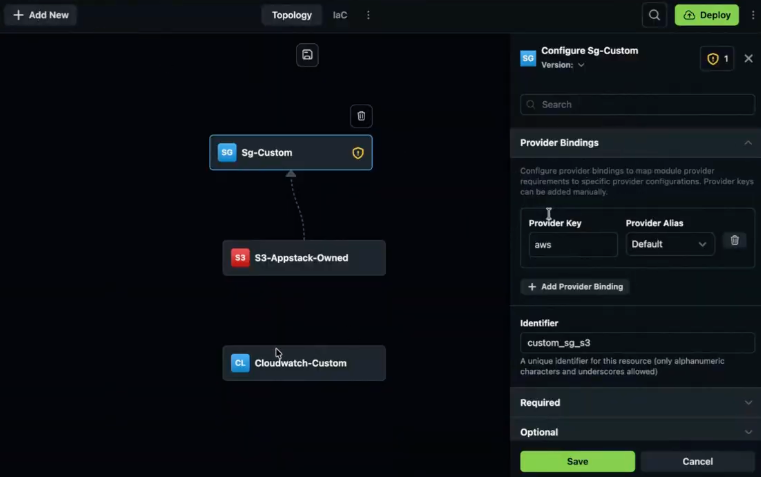
Why It Matters
You see advanced provider wiring only when it is relevant, which keeps the default Topology and Terraform surfaces easier to scan while you place resources.
Read more in Topology.
Removal of grouped resources (Lambda/EC2)
Click to view
We have changed how Lambda, EC2 Service, Workloads, and similar types land on the Topology canvas. Before, dragging one of those resources could drop a grouped bundle (for example Lambda plus an attached IAM role and CloudWatch log group as one placed unit). That grouped placement is removed because only a small set of types behaved that way, and single-node placement gives you tighter control.
Individual nodes
Each of those primaries is now a single resource on the canvas. You pick the node yourself instead of inheriting a packaged set of sidecar resources.
Connections
You place supporting pieces only when you need them and draw the relationships yourself. Drag-and-drop no longer pulls auxiliary resources in automatically next to the primary.
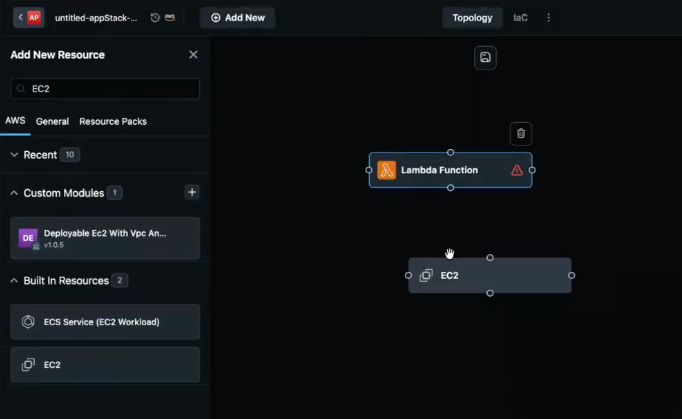
Why It Matters
You decide exactly which supporting resources exist and how they connect, instead of inheriting a fixed bundle you may not have wanted.
Read more in Add New Resource.
What's Fixed
Incorrect UI tagging
Click to view
We have fixed an issue where a specific tag in the UI displayed the wrong text for what we ship in this release. The label now matches the intended wording so the surface lines up with the current product state.
Topology import server error
Click to view
We have fixed an issue where importing topology JSON that referenced custom modules not yet present in the project produced a generic internal server error. Previously, that response hid which module was missing, so troubleshooting meant guessing or opening a ticket.
The UI now surfaces an actionable module does not exist message, names the missing module, and lets you onboard or import it before you retry the import.
GitHub MCP branching via Aiden
Click to view
We have fixed an issue where GitHub MCP branching through Aiden could fail, including when you asked for branches with conversational prompts. That regression blocked SCM branching from the IDE whenever you relied on the assistant.
Branch operations now complete successfully for both scripted-style and natural-language requests, so you can manage Git branches next to assistant-driven work again. Teams with repeatable prompts can still copy them into an internal runbook so everyone stays aligned.
Inferred connection types in resource packs
Click to view
We have fixed an issue where resource packs saved inferred connections as data during create and save, which broke rendering when you opened or reused the pack after the connection work shipped.
New resource packs now persist inferred edges with the correct type so the canvas matches what you authored. Very large or older packs may still look off in rare cases; if that happens, recreate or simplify the pack after save.
State reset on topology change
Click to view
We have fixed an issue in Plan and Deploy where the UI kept a successful Plan state after you changed the topology (for example adding or moving a resource). Previously, the screen still looked ready to Deploy even though the graph no longer matched the plan you had run.
Any topology change now clears stale plan state and you must run a fresh plan before Deploy is allowed again, which prevents deploying infrastructure that does not match the canvas you are viewing.
Read more in Plan & Deploy.
Supported Resources
Click to view
With this release, we've added additional support resources across our clouds. Refer to the Supported Resources document to view the complete list.