Backstage User Guide
Overview
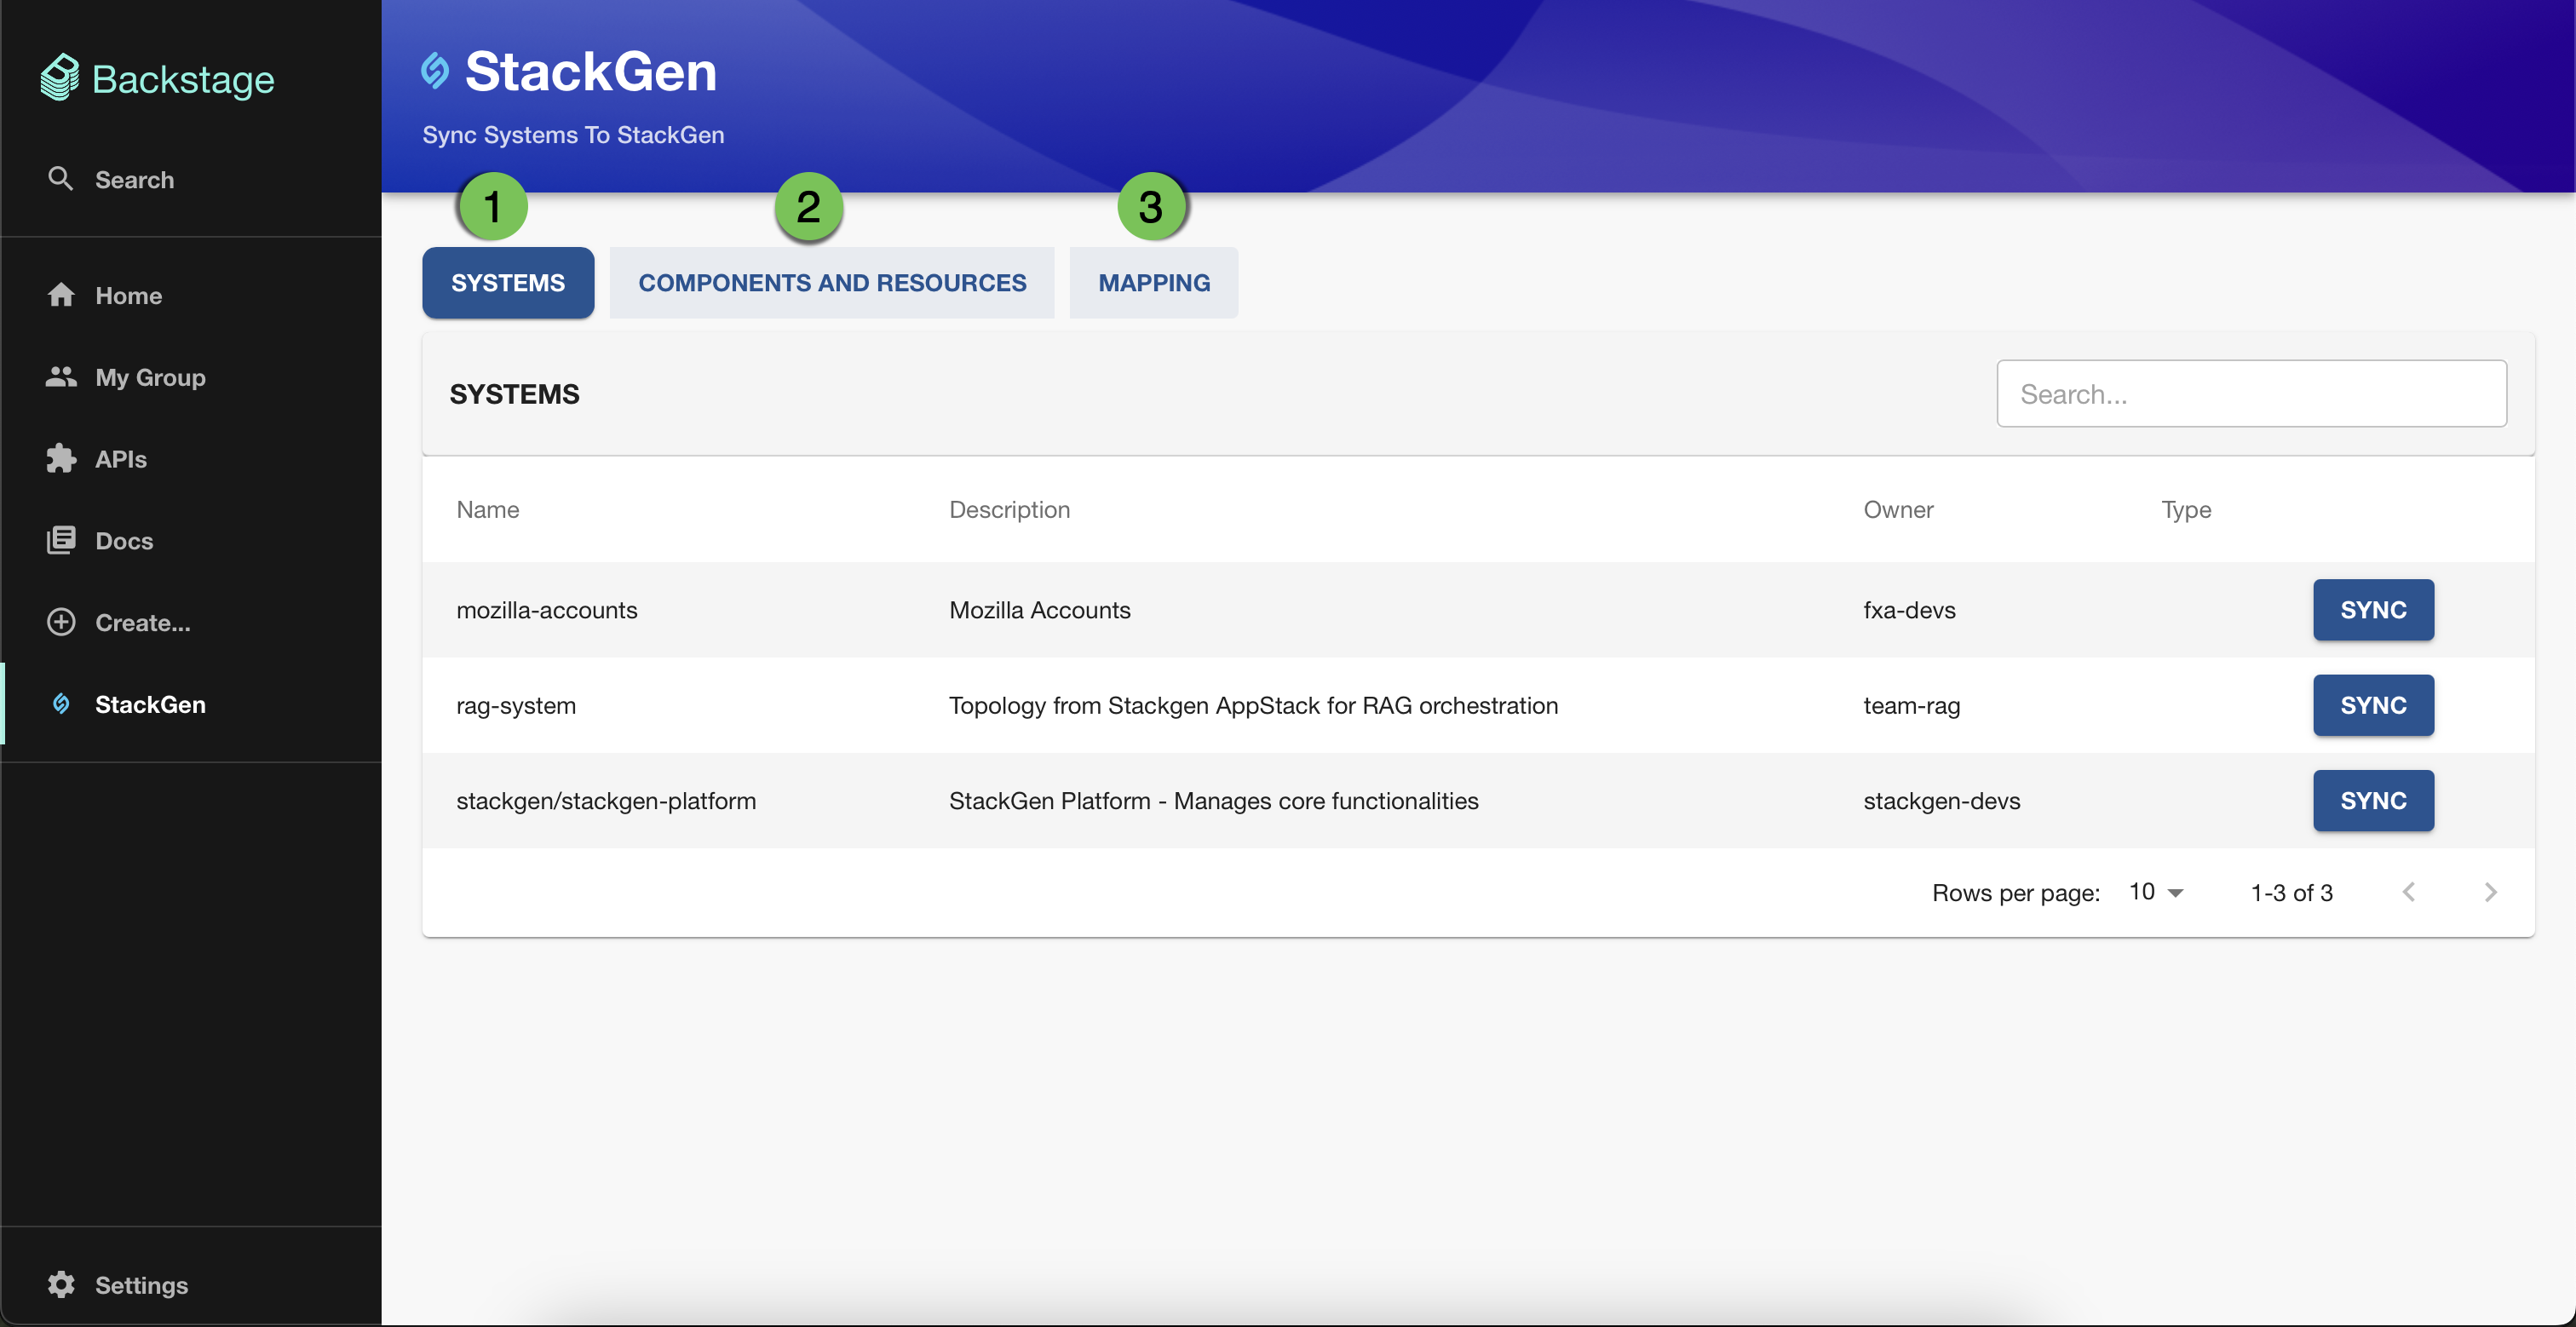
The StackGen-Backstage user interface consists of three subtabs:
-
Systems: lists all available systems with key metadata. You’ll notice a Sync button next to the systems you’ve configured, used to create or update an appStack.
-
Components and Resources: While components are equivalent to a compute resource in StackGen (for example, AWS Lambda or HELM workload, etc.), resources on Backstage represent data storage entities. (for example, SQL database, s3 bucket, etc).
-
Mappings: you can map a resource type in Backstage to its equivalent in StackGen.
note- Currently, you cannot add more than one system to your integration. This is preconfigured for you by our Support Team when you request access to the StackGen-Backstage plugin.
- You can only map your resource types to StackGen-supported ones. Currently, you cannot sync custom modules using the StackGen-Backstage integration.
The processes of syncing and creating an appStack on StackGen consist of the workflows listed below.
-
IaC from Backstage Systems: Use this feature when you have systems defined within backstage that consist of multiple components and resources.
-
User Action: Catalog components (e.g., microservices, libraries) and resources (e.g., databases, caches) in the Backstage System.
-
System Support: Backstage integration maps these entities to StackGen’s data model.
noteDefining a system is not a strict requirement in Backstage. It's possible that you may not have any systems configured. You can still use the Components and Resources tab to select the desired items and sync them with StackGen.
-
-
IaC from Backstage Cataloged Components and Resources: Use when you have not defined a system but have a catalog of Components and Resources.
- User Action: Select components or resources within Backstage.
- System Action: StackGen auto-generates Infrastructure as Code (IaC) based on mappings from catalogued items to cloud resource templates.
Let’s learn about each method in detail.
Prerequisites
- Before you begin, you need to install the StackGen-Backstage Plugin.
- Before generating an appStack in StackGen from Backstage, you’ll need to create and configure a mapping.
Create a Mapping Between Backstage and StackGen Specs
Click to view
Mappings help you identify an equivalent of your backstage specification in StackGen. Follow these steps to create a mapping:
Create a Mapping
-
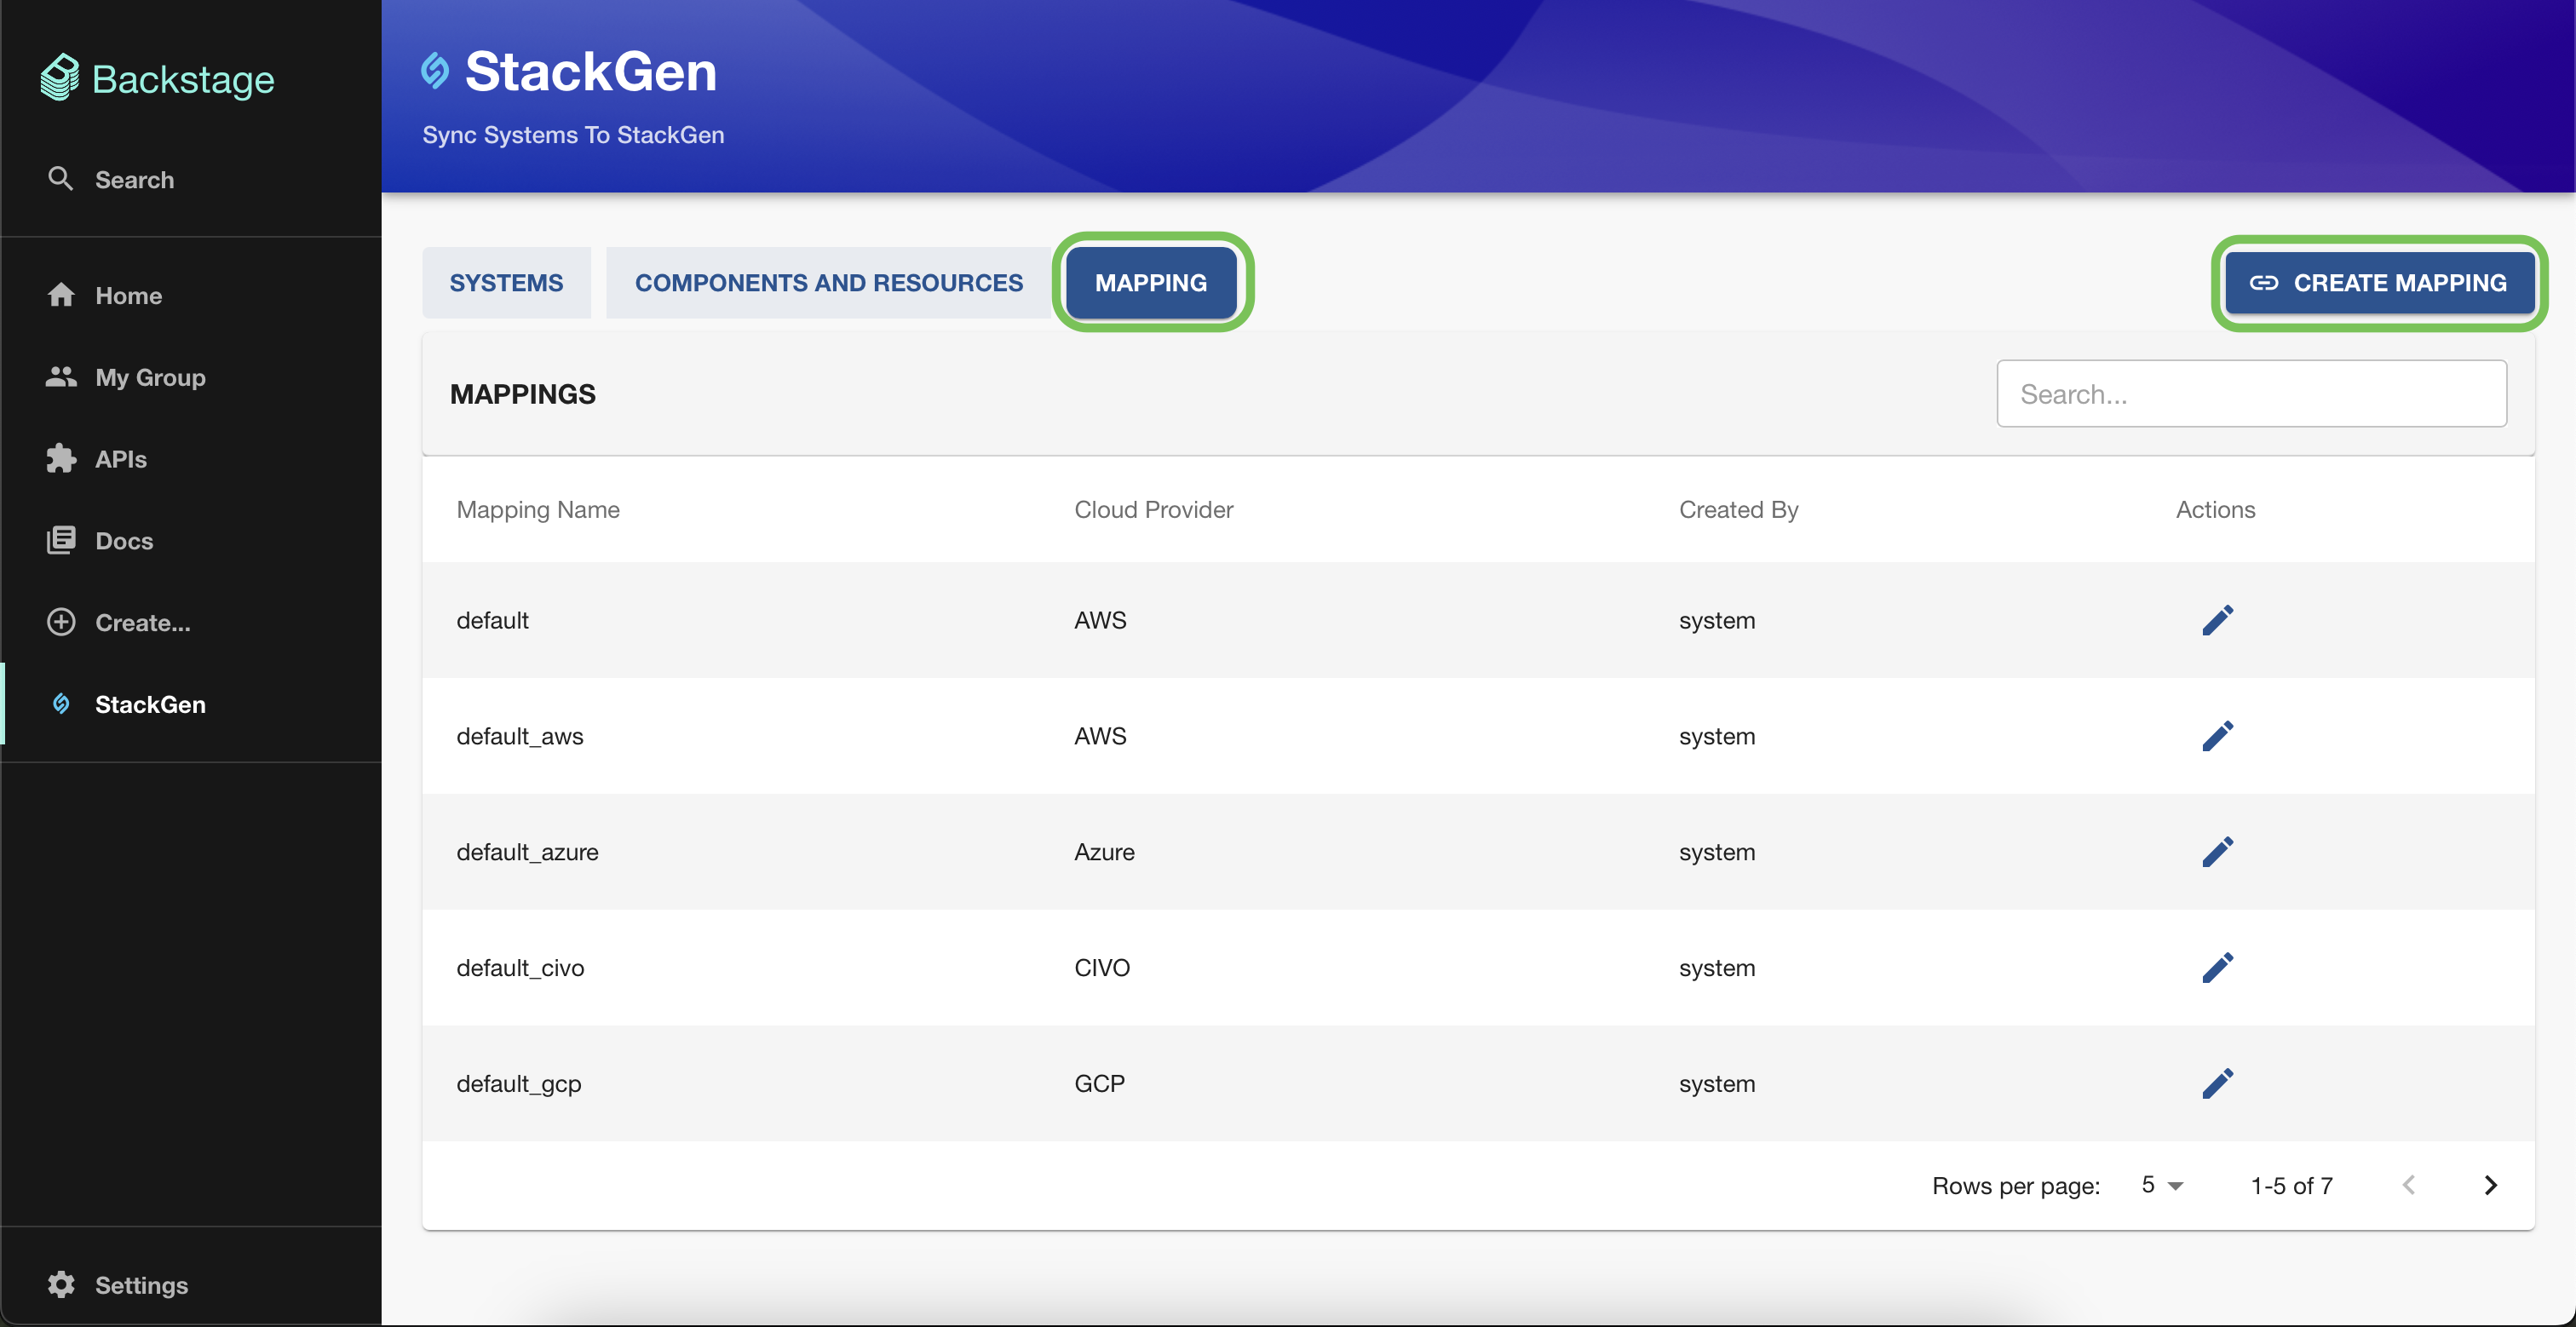
From the plugin home page, navigate to Mappings > click Create Mapping.
-
Enter the mapping fields as follows:
-
Cloud Provider: select the cloud provider for which you want to create an appStack. You can choose from the following list:
- AWS
- GCP
- Azure
- Civo
noteCurrently, you can only create appStacks using StackGen-supported cloud providers.
-
Mapping Name: Enter a unique name for your mapping.
-
Backstage Spec Type → StackGen Resource Type drop-downs: Map each backstage type, for example, a
databaseor aservice, to a corresponding StackGen Resource, for example, e.g.,aws_rdsorgcp_sql. -
You can create as many mappings as required by clicking + ADD.
-
-
Click Create to save your mapping.
Modify a Mapping
You can view the list of your mappings under the Mappings tab.
-
To edit a mapping, click the pencil ✎ icon next to the mapping of your choice.
-
To delete a mapping:
- Click the bin 🗑️ icon next to the mapping of your choice.
- A Delete Mapping dialog will pop up.
- Click Delete.
noteYou cannot delete default mappings as they are required, but you can edit the values.
Thinking of Updating a Mapping? Here’s What It Means for Your appStack
You can expect the following behaviour when you modify a mapping:
- appStacks: Any changes to your mapping will not get synced with StackGen automatically. You will need to manually sync your changes by updating an appStack.
- Systems: Only the components and resources that have a mapping will get synced with StackGen.
- Components and Resources: Based on your mapping, StackGen will overwrite the existing appStack with the components and resources you have added or deleted.
IaC from Backstage Systems
Click to view
Create an appStack
Before you create an appStack from your Backstage systems, you’ll need to create and configure the mapping between Backstage and StackGen.
-
From the StackGen plugin homepage, navigate to Systems > Sync.
-
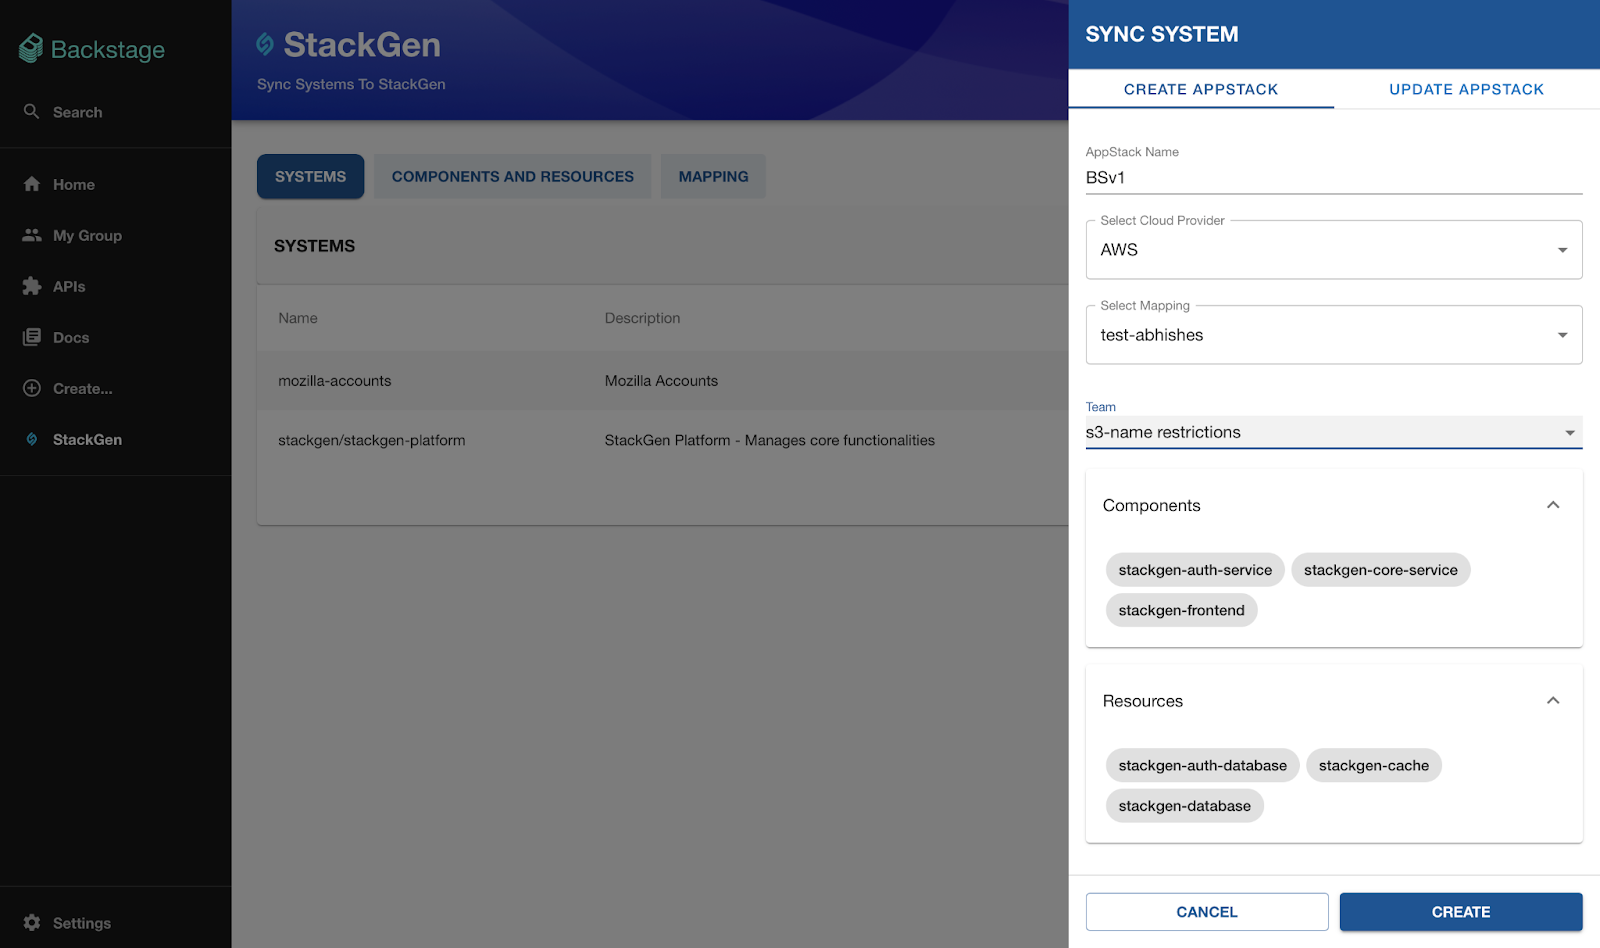
From the Sync System dialog, click Create appStack.
-
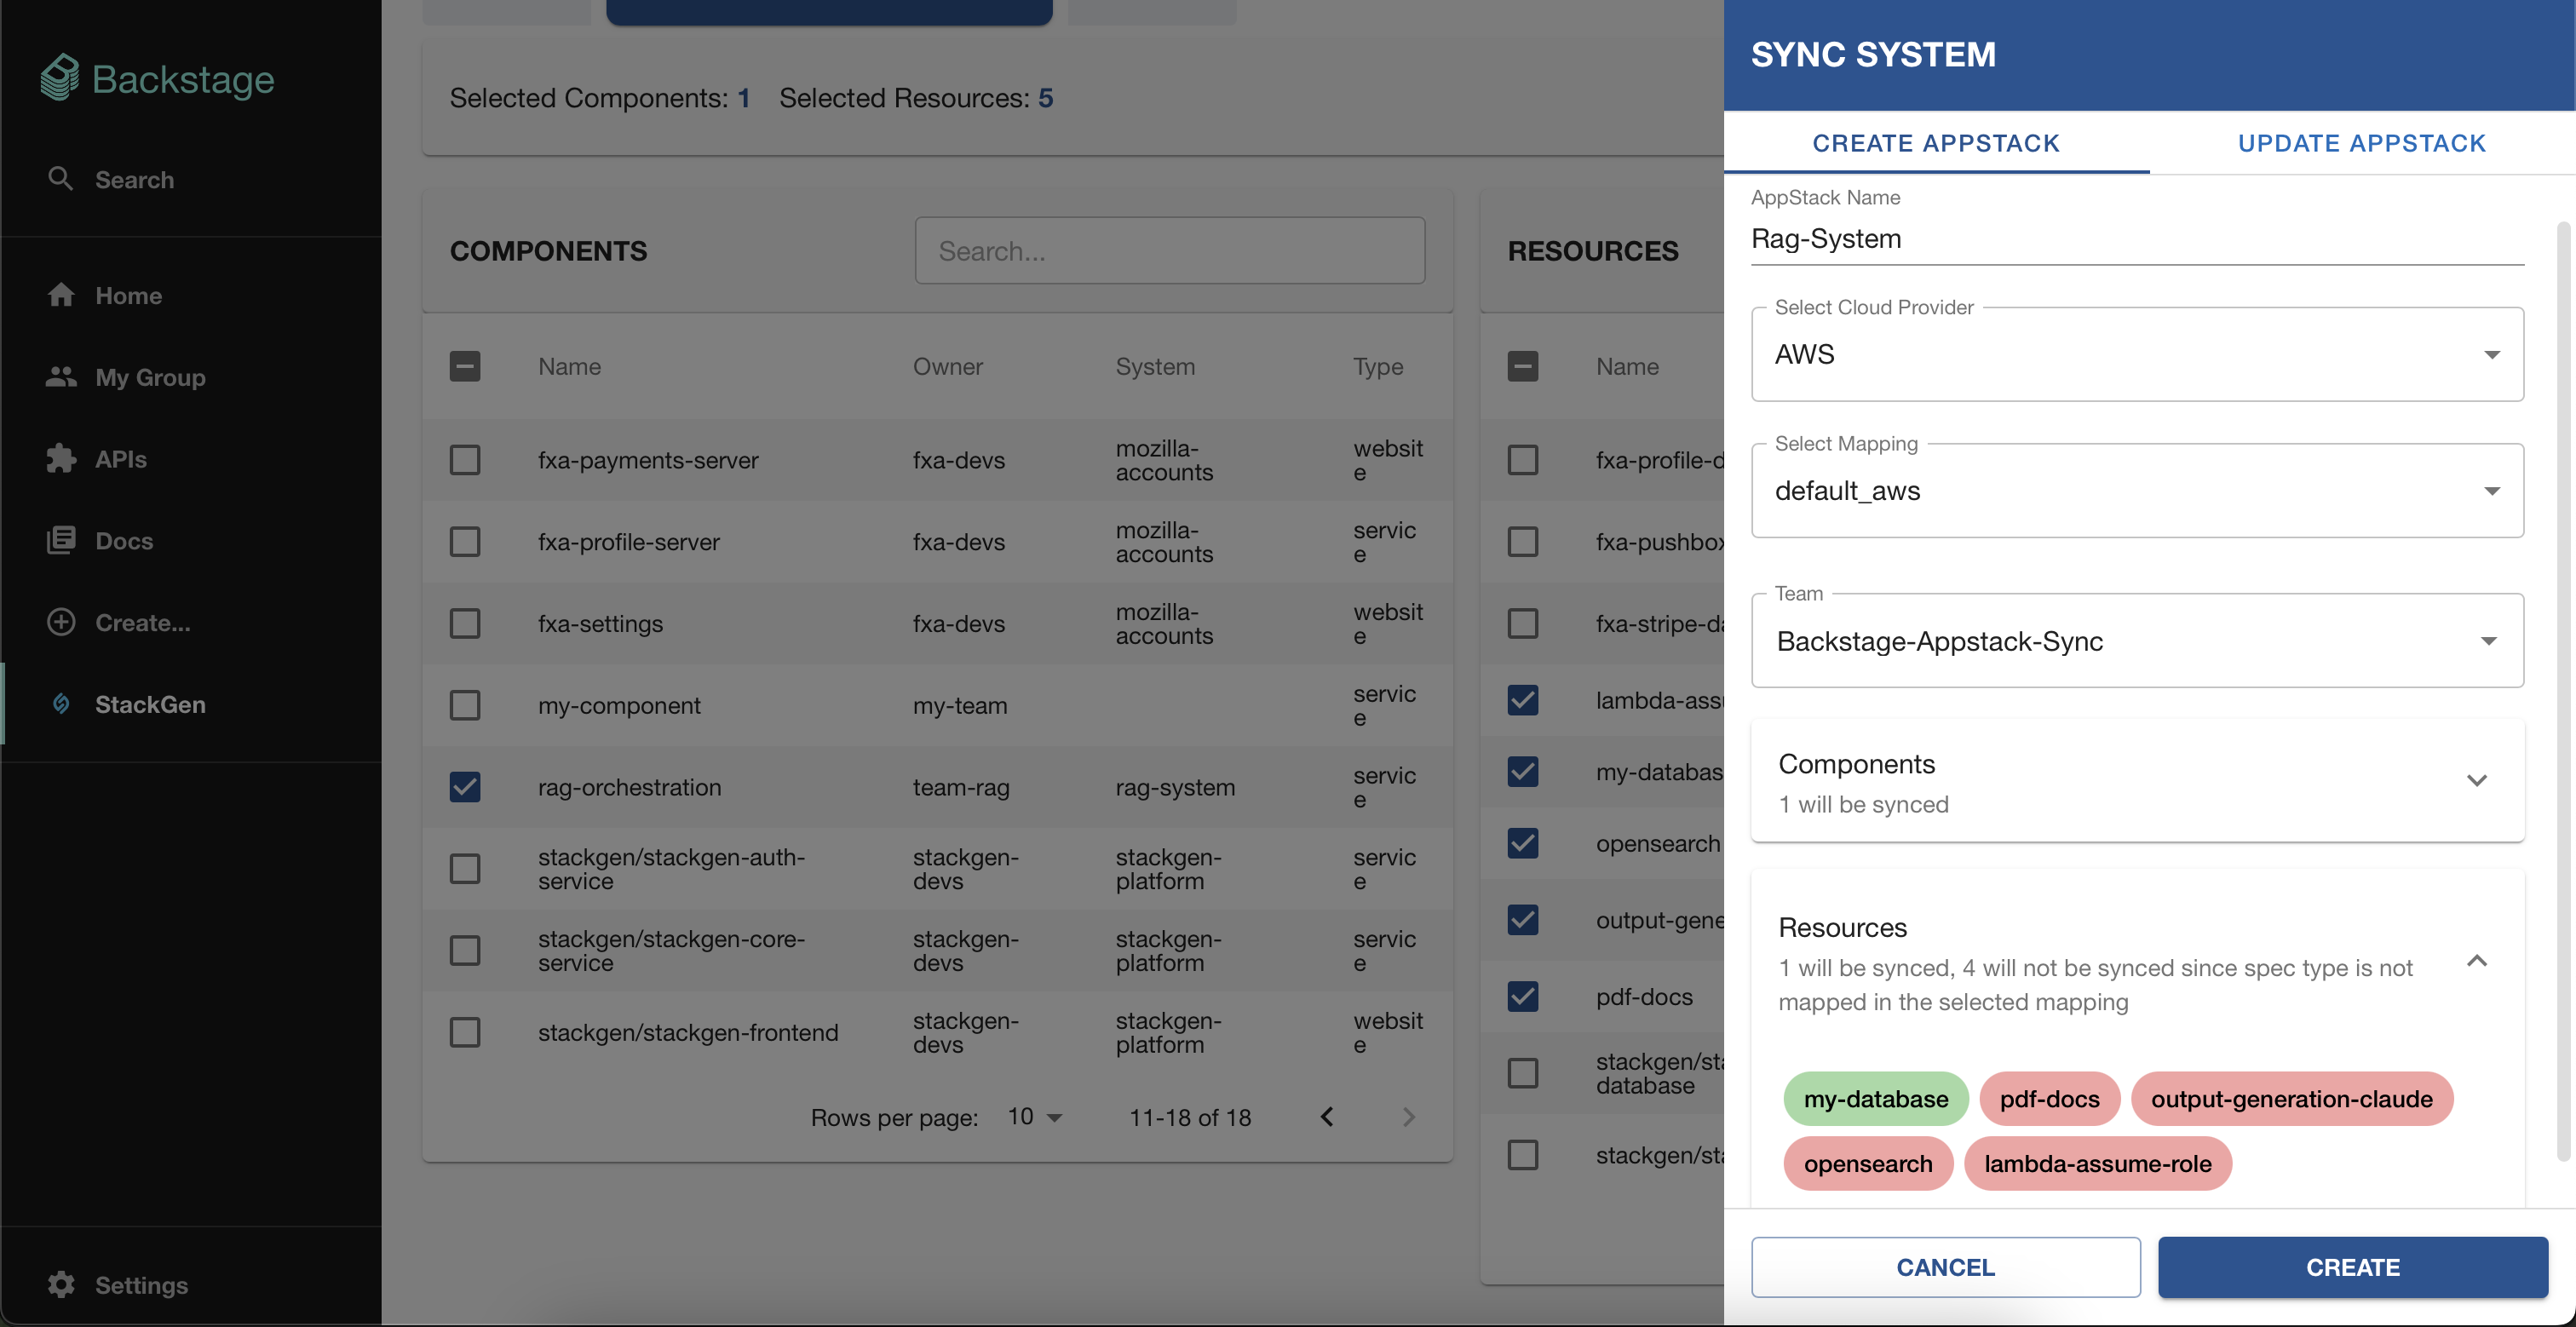
Enter the following details:
- appStack Name: Enter a unique name for your appStack.
- Cloud Provider: Select the provider for your appStack from the dropdown.
- Mappings: Select the mapping from the list of available mappings you’ve configured in Backstage for the selected cloud provider.
- Team: Select the team where you want to create the appStack. You’ll notice that the system’s components and resources populate automatically.
-
Click Create to finish creating the appStack.
-
Click View to review your appStack on StackGen.
Update an appStack
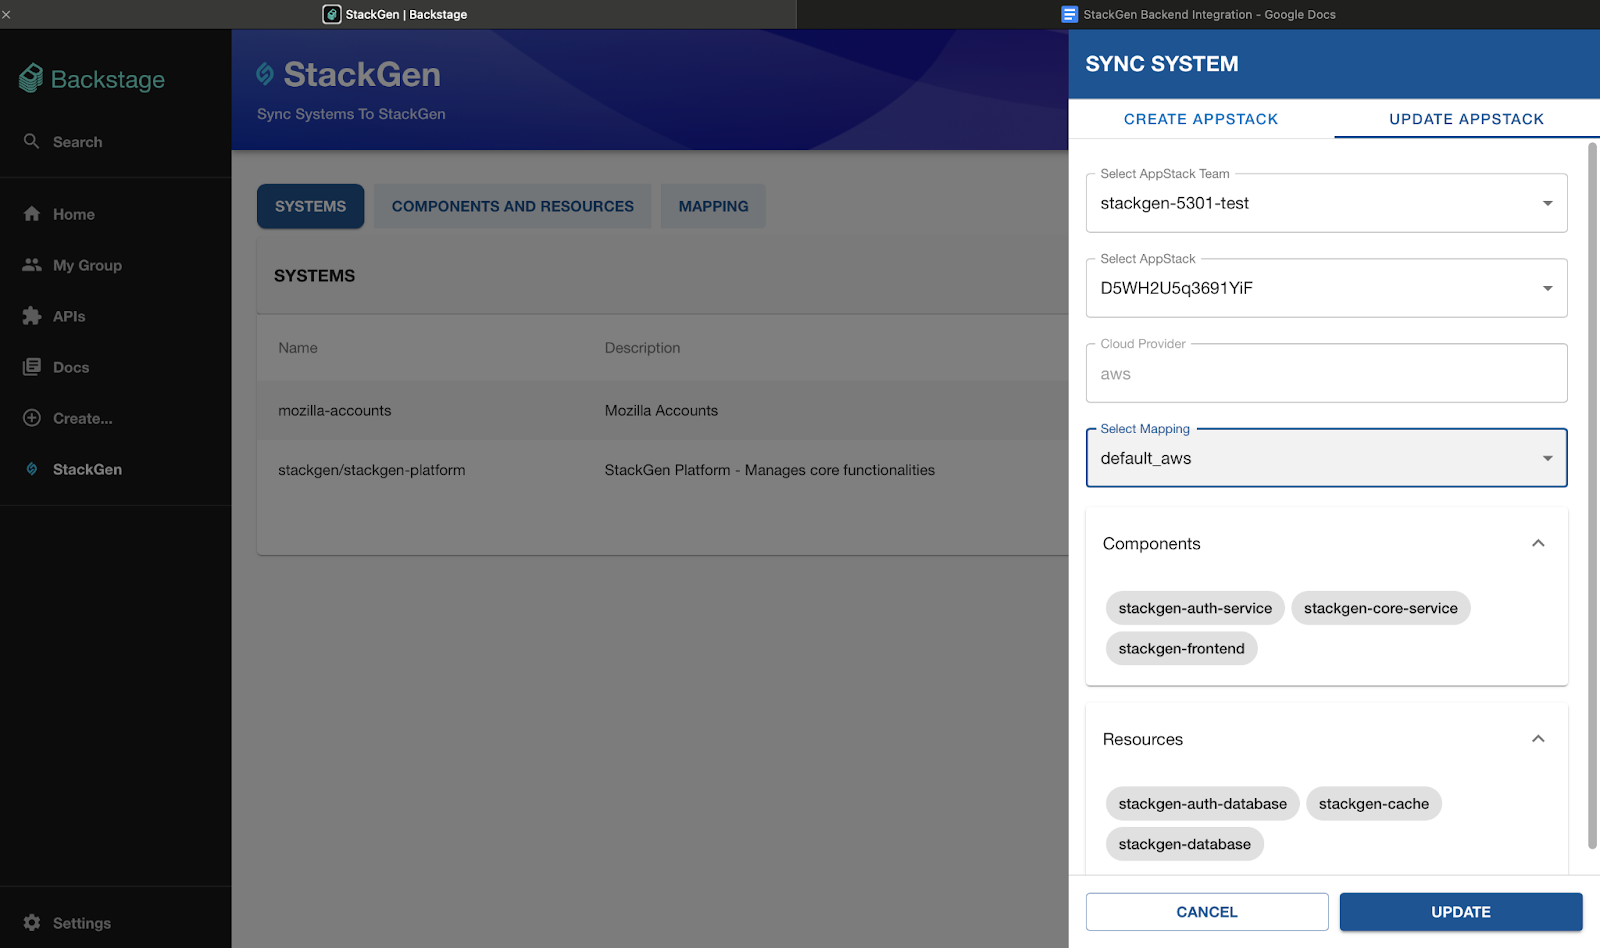
- With appStack updates, you can only update the Mapping. You will not be able to modify the appStack Name and the Cloud Provider.
- StackGen will not create new versions of your appStack, unlike the way it does on the cloud. Instead, it will overwrite your existing appStack based on the updated mappings.
- You can only update the Mapping.
- From the StackGen plugin homepage, navigate to Systems > Sync.
- From the Sync System dialog, click Update appStack.
- Select your Team and the corresponding appStack from the respective dropdowns.
- Click Update to apply your changes.
- Click View to review your appStack on StackGen.
IaC from Cataloged Components and Resources in Backstage
Click to view
Create an appStack
Before you create an appStack from your Backstage systems, you’ll need to create and configure the mapping between Backstage and StackGen.
- From the StackGen plugin homepage, navigate to Components And Resources > Sync.
- Select the Components and Resources that you want to sync with StackGen from the list.
- From the Sync System dialog, click Create appStack.
- Enter the following details:
- appStack Name: Enter a unique name for your appStack.
- Cloud Provider: Select the provider for your appStack from the dropdown.
- Mappings: Select the mapping from the list of available mappings you’ve configured in Backstage for the selected cloud provider.
- Team: Select the team where you want to create the appStack. You’ll notice that the selected components and resources are listed automatically.
- Click Create to finish creating the appStack.
- Click View to review your appStack on StackGen.
Update an appStack
- With appStack updates, you can only update the Mapping. You will not be able to modify the appStack Name and the Cloud Provider.
- StackGen will not create new versions of your appStack, unlike the way it does on the cloud. Instead, it will overwrite your existing appStack based on the updated mappings.
- You can only update the Mapping.
-
From the StackGen plugin homepage, navigate to Systems > Sync.
-
From the Sync System dialog, click Update appStack.
-
Select your Team and the corresponding appStack from the respective dropdowns.
-
Click Update to apply your changes.

-
Click View to review your appStack on StackGen.