StackGen Settings
StackGen Settings
With the July 2025 release, Teams has been renamed to Projects across the StackGen platform. This change reflects our broader vision of enabling cross-functional collaboration around infrastructure, code, and compliance workflows under clearly scoped project workspaces. All existing functionality remains the same and only the terminology has been updated to better align with how you organize and manage appStacks, modules, and cloud environments in real-world settings. You’ll now see Projects wherever Teams was previously referenced in the UI, CLI, and documentation.
The Settings page in StackGen provides a structured way to configure profile, user roles, security, collaboration, and governance.
Navigating to the Settings Page
StackGen settings are split between the User Menu and Enterprise Configuration menus at the bottom of the left sidebar (see Navigating UI).
User Menu (profile and personal access):
- Click User Menu at the bottom of the sidebar.
- Open Profile details for account information, or use links such as Personal Access Tokens from the same menu.
Enterprise Configuration (projects, members, secrets, and governance):
- Click Enterprise Configuration at the bottom of the sidebar.
- Open All Projects, Members, Policy Management, or Governance Configurations as needed.
You can still reach many of the same tasks from project scope. For example, open Secret Store from Settings while you work inside a project.
The StackGen settings page is grouped into the following sections:
Let's look at these sections in detail.
Account
Click to view
- Profile Details: You can update personal information such as name, email, and company name.
- License Information: You can find information about your StackGen Tenant Id here.
- Personal Access Tokens (PATs): Generate and manage secure authentication tokens for API access and automation. To learn more about PATs, refer to the Personal Access Token article.
You can enable sign-in with SSO (single sign-on with Microsoft Entra ID (Azure AD)), which is configured outside the Account section and outside the StackGen UI. To configure SSO, see Configure Your Microsoft Entra ID (Azure AD) OAuth 2.0.
Project Management
Members
Click to view
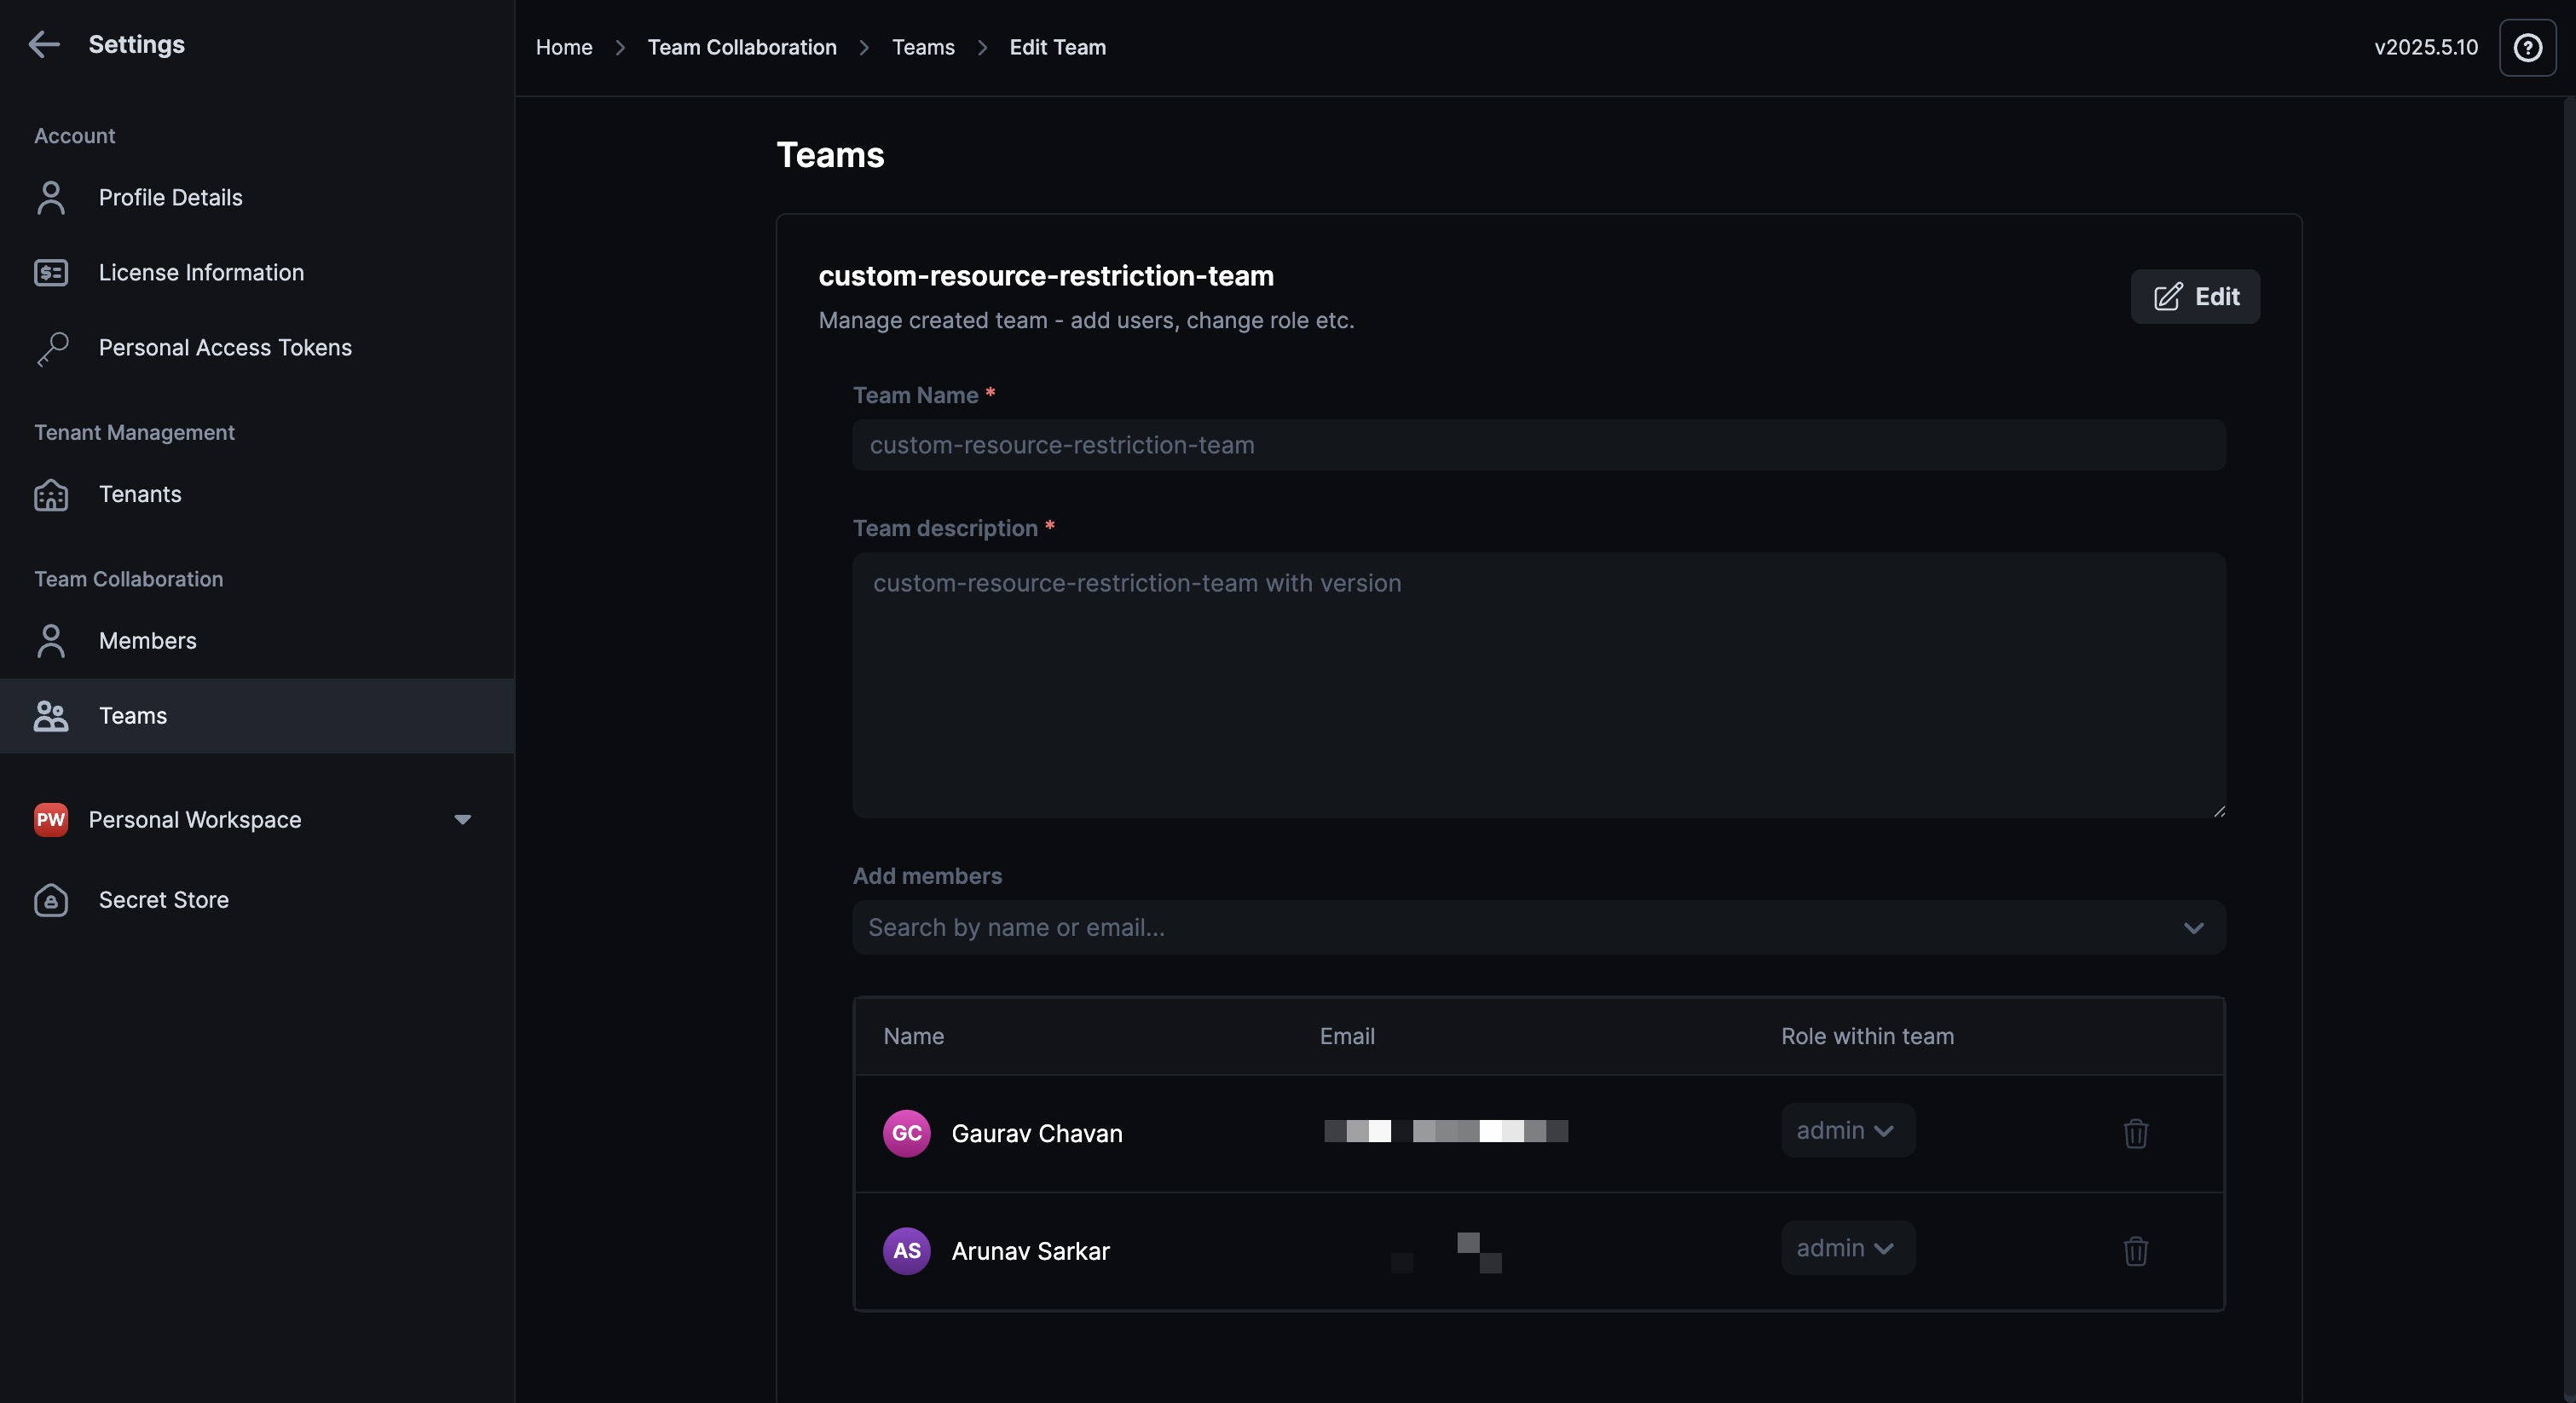
StackGen onboards members via the Org-specific IDs used while logging-in to the platform. You can assign roles and Projects via the Members section.
To learn more about roles, refer to the article RBAC Levels and Roles.
Projects
Click to view
Group users into Projects to streamline access control and collaboration. You will be able to view and manage Projects directly from the Projects page under Settings.
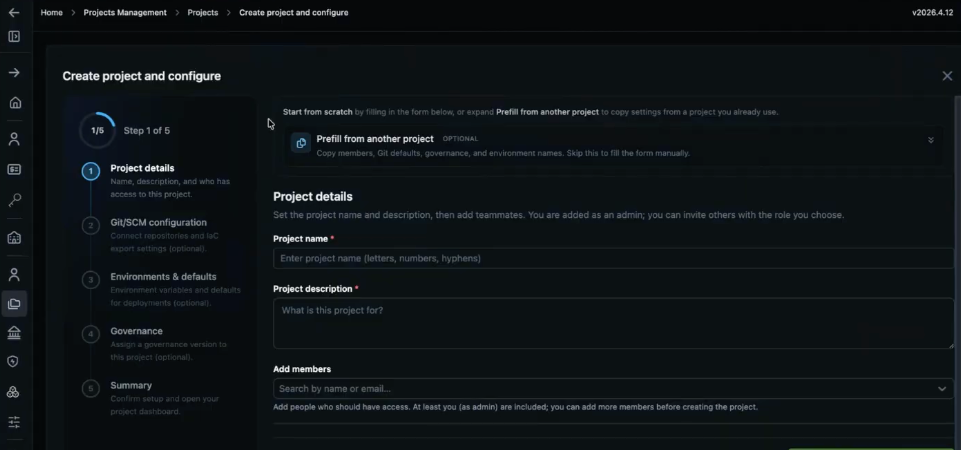
Create a Project
Project creation uses a guided onboarding flow. From the Projects page in Settings, you can define project details, members, SCM, environments, and governance before you finish.
To create a new project, follow these steps:
- Click + New Project.
- Enter the Project Name and Project description.
- Add members if needed. By default, StackGen assigns the Developer role. Use Role within Project if you want to change the role before you continue.
- Optional: use Prefill from another project if you want to copy settings from an existing project.
- Continue through the guided steps for SCM, environments, governance, and summary.
- Review the configuration and finish project creation.
If you skip optional onboarding steps, use the Project Dashboard setup guide to complete them later. For the full walkthrough, see Create a Project with Guided Onboarding.
Open StackBuilder Agent From a Project
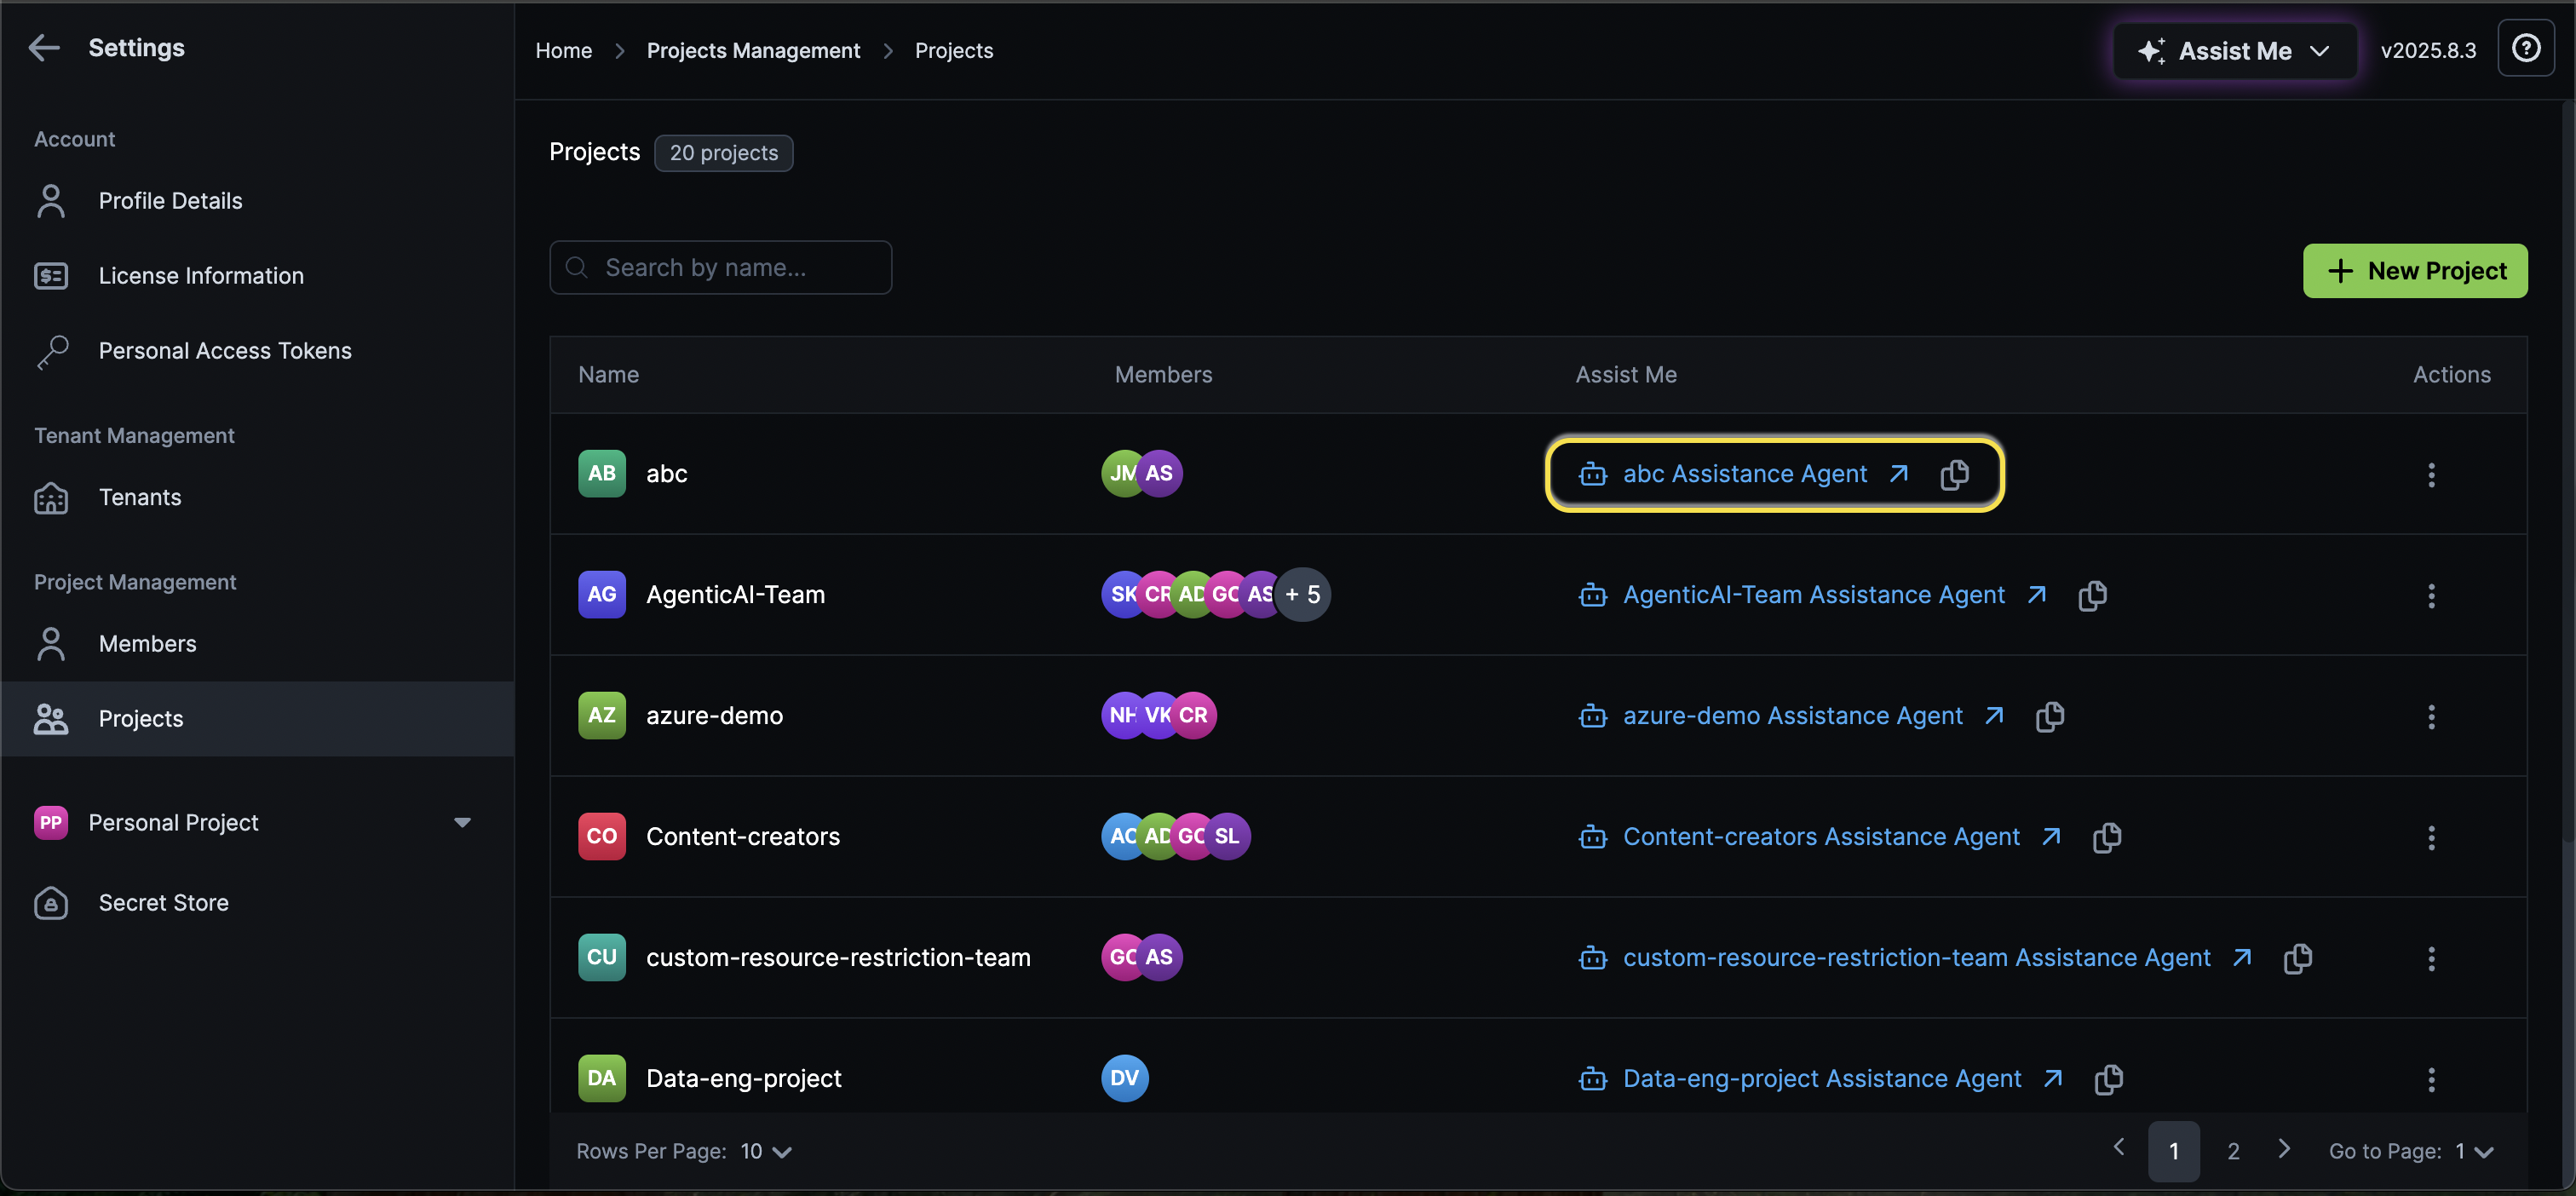
When you're done creating a project, you'll see an Assist Me link or click the clipboard icon to copy and open the link to the StackBuilder Agent for a specific project. You can create appStacks or run prompts that are project-specific using this link.
Modify a Project
To edit an existing project, add members, or edit their roles, follow these steps:
- From the Settings page, navigate to Projects page.
- From the list of available Projects, click the project that you want to edit.
- Click Edit to modify the Project details.
- Once finished, click Done.
Delete a Project
To delete a project, click the ellipsis ⋮ icon next to the project under the Actions column, and click Delete
Notifications Channel
Click to view
StackGen supports sending drift and appStack event notifications to external systems like Slack, Email, and Discord.
Create a Notification Channel
Follow these steps to configure notification channels and subscribe your appStacks to them.
- From the StackGen Home page, Navigate to Settings > Notification Channels.
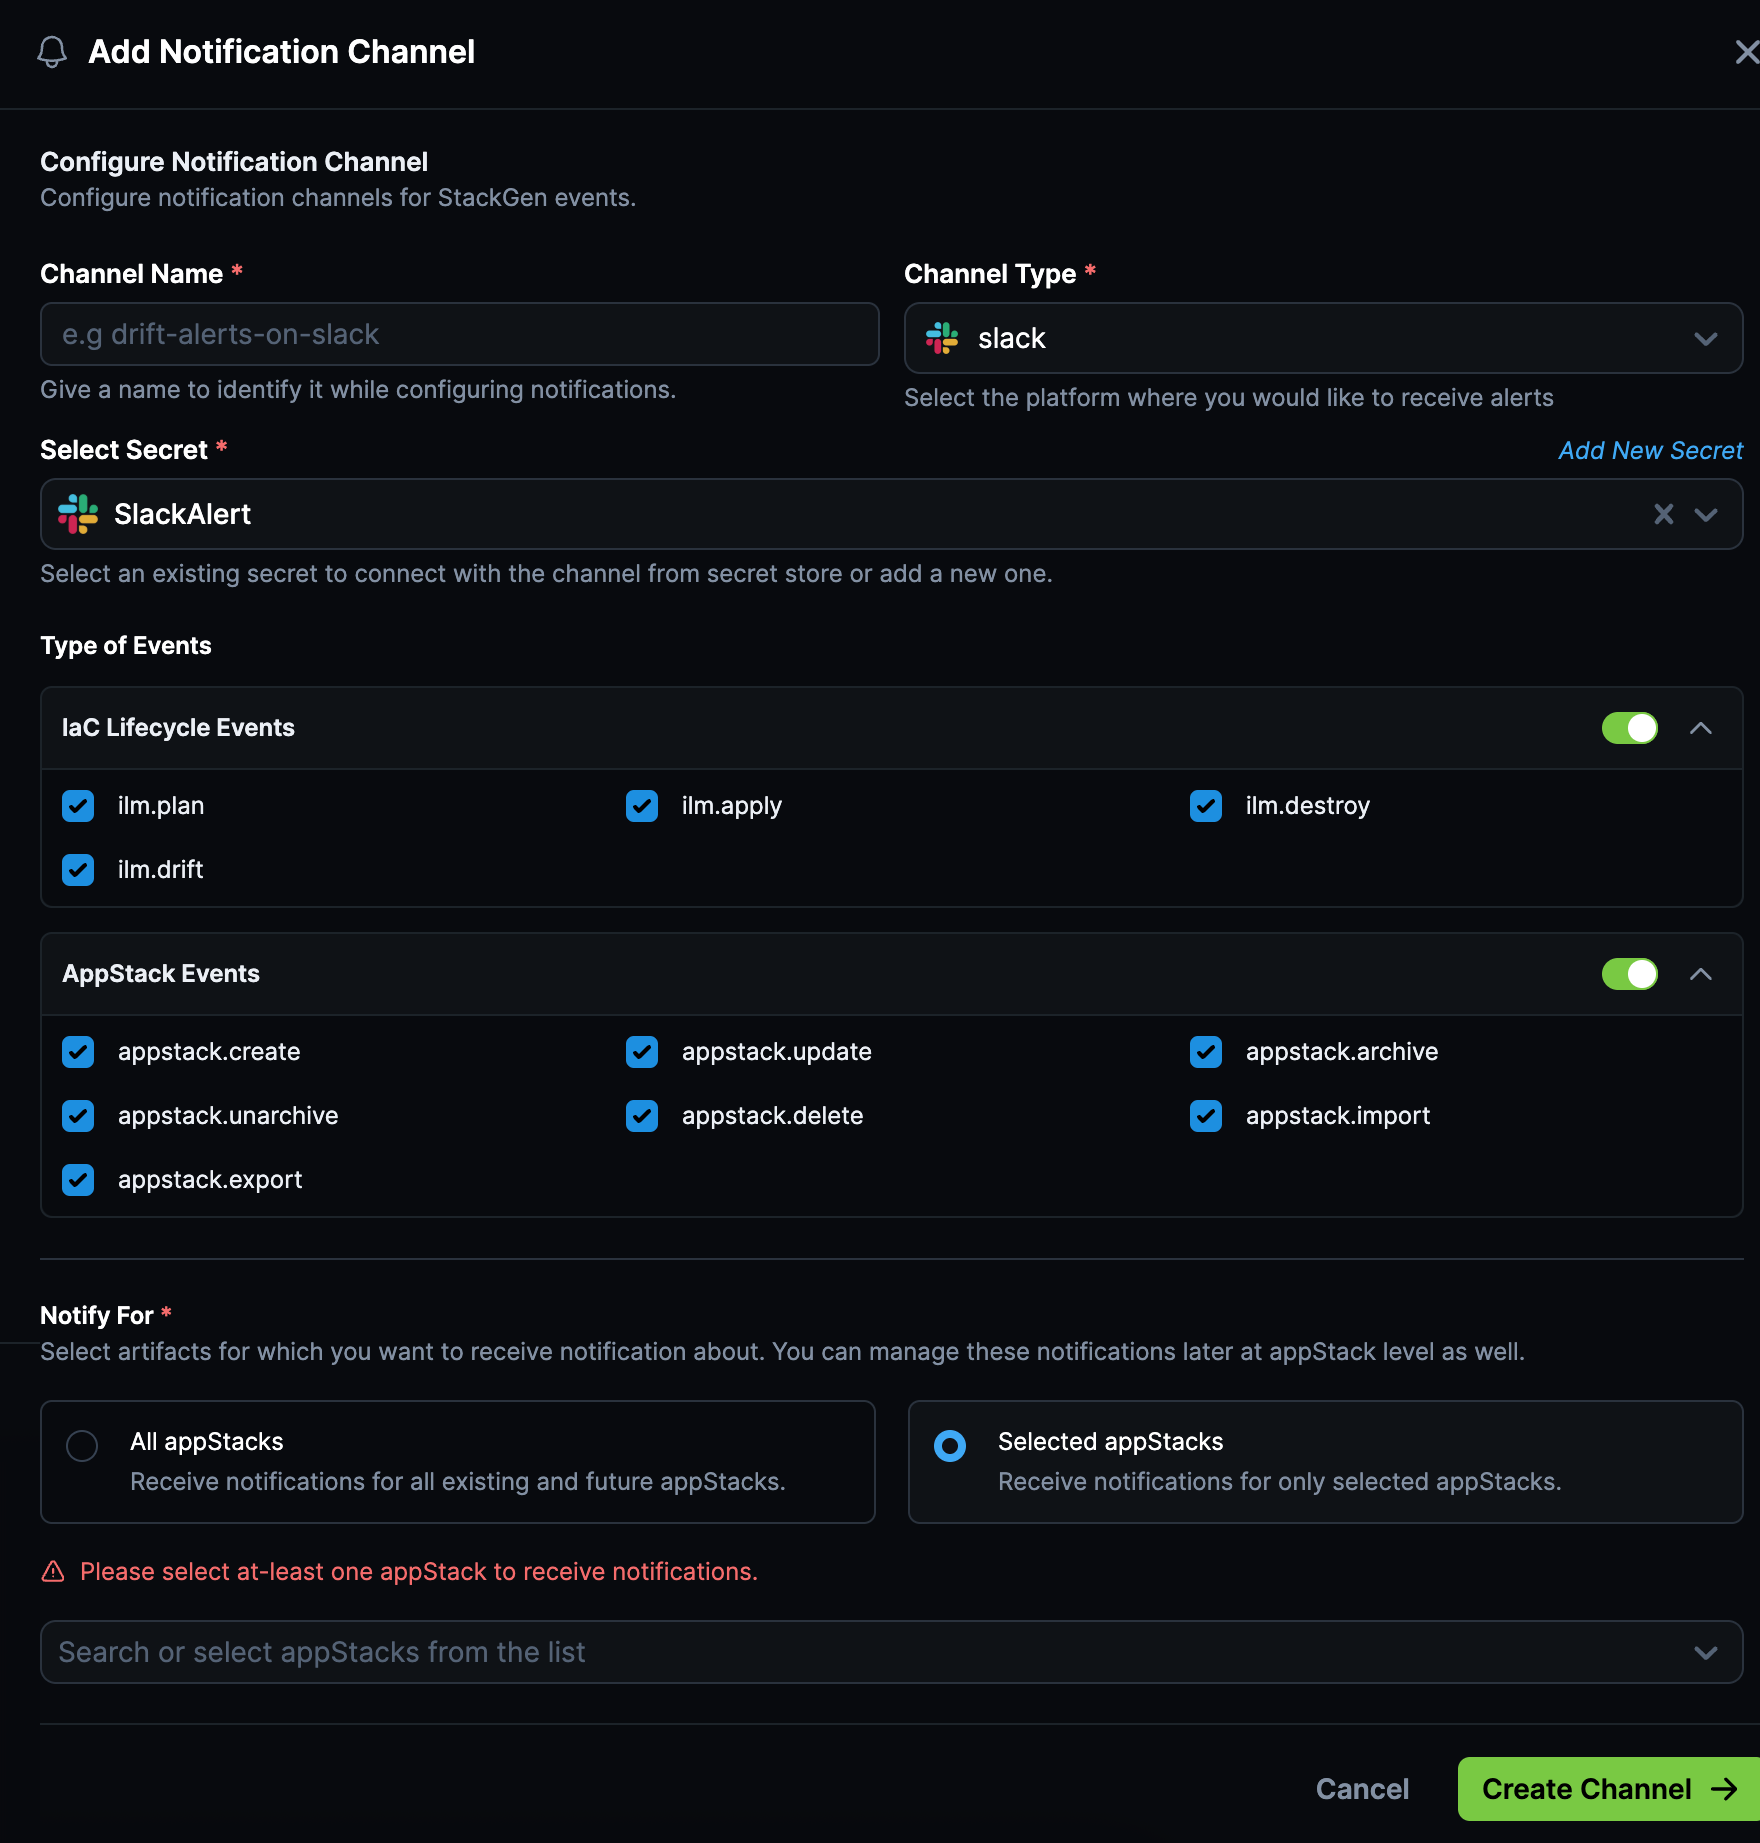
- Click + Add new Notification Channel.
- Fill in the required fields:
- Channel Name: The name for your notification channel (e.g.,
infra-alerts-slack). - Channel Type: Select the destination application (Slack, Email or Discord.).
- Select Secret: Choose from existing secrets or add a new one to authenticate the integration.
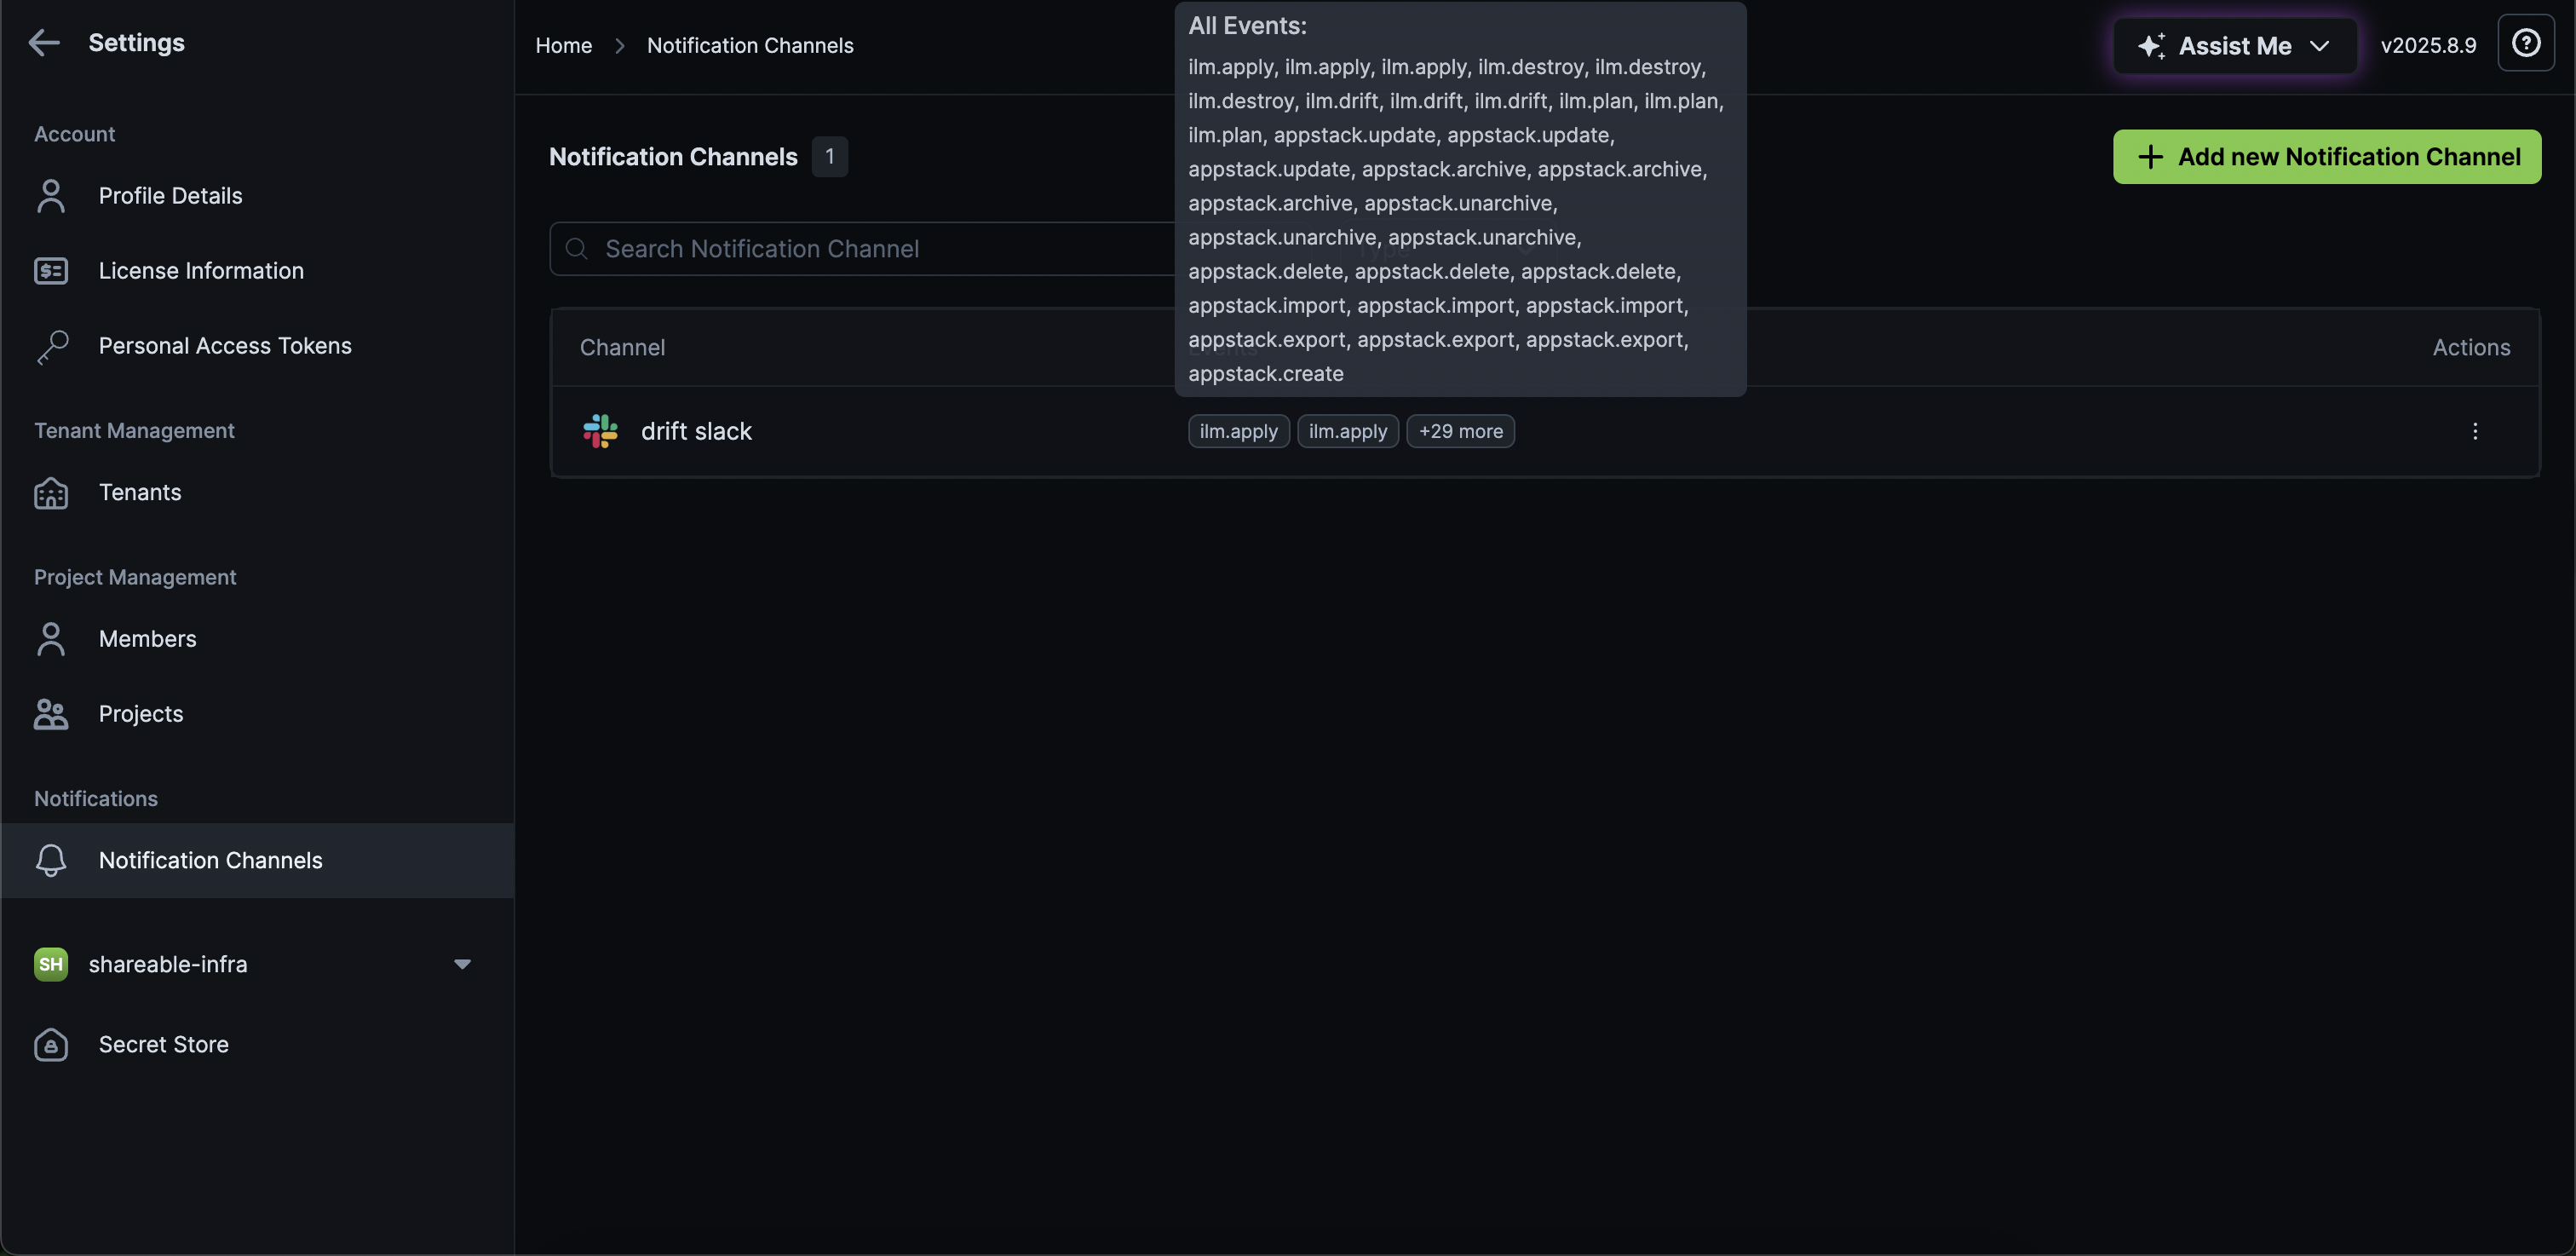
- Under Type of Events, choose the events this channel should receive alerts for:
- IaC Lifecycle Events: The following ILM events are supported:
- Plan
- Apply
- Drift
- Destroy
- appStack Events: The following appStack events are supported
- Create
- Update
- Archive
- Unarchive
- Delete
- Import
- Export
- IaC Lifecycle Events: The following ILM events are supported:
- Under Notify For, select:
- All appStacks: Receive alerts for every appStack.
- Selected appStacks: Subscribe only to notifications from specific appStacks. All appStacks within the project are listed in the dropdown, and you can select one or multiple appStacks to subscribe to notifications.
- Once done, click Create Channel.
You can view all the events that a particular channel is subscribed to under the Events column.
Delete a Notification Channel
Follow these steps to delete an existing Notification Channel:
- From the StackGen Home page, Navigate to Settings > Notification Channels.
- From the list of Notification Channels, click the ellipses ⋮ icon under the Actions column for the channel you want to delete.
- Click the bin 🗑️ to delete the channel.
Projects Assigned
Click to view
The Projects Assigned dropdown lets you view the projects that you've been assigned to. Use this drop-down to switch between projects and create your infrastructure that is aligned with the policies and configurations assigned to the project.
Personal Workspace
You can still open and manage existing appStacks in a Personal Workspace.
- Creating a new appStack in a personal workspace is no longer supported from the UI.
- If you delete the last appStack in a personal workspace, StackGen redirects you to the first collaborative project you can access.
Use a shared Project for new work so governance, credentials, and team access apply from the start.
Secret Store
Click to view
You can select a project from the Projects drop-down and then create the Secret Store.
The secret store lets you:
- Securely store sensitive credentials for your SCM provider.
- Share your secret store with your projects without compromising your credentials.
- Connect to external secret managers like AWS Secrets Manager to reference secrets stored outside StackGen.
Types of Secret Stores
StackGen supports two types of secret stores:
Internal Secret Store
Internal secrets are stored directly in StackGen and managed within the platform. These secrets are created and stored in StackGen's secure secret store.

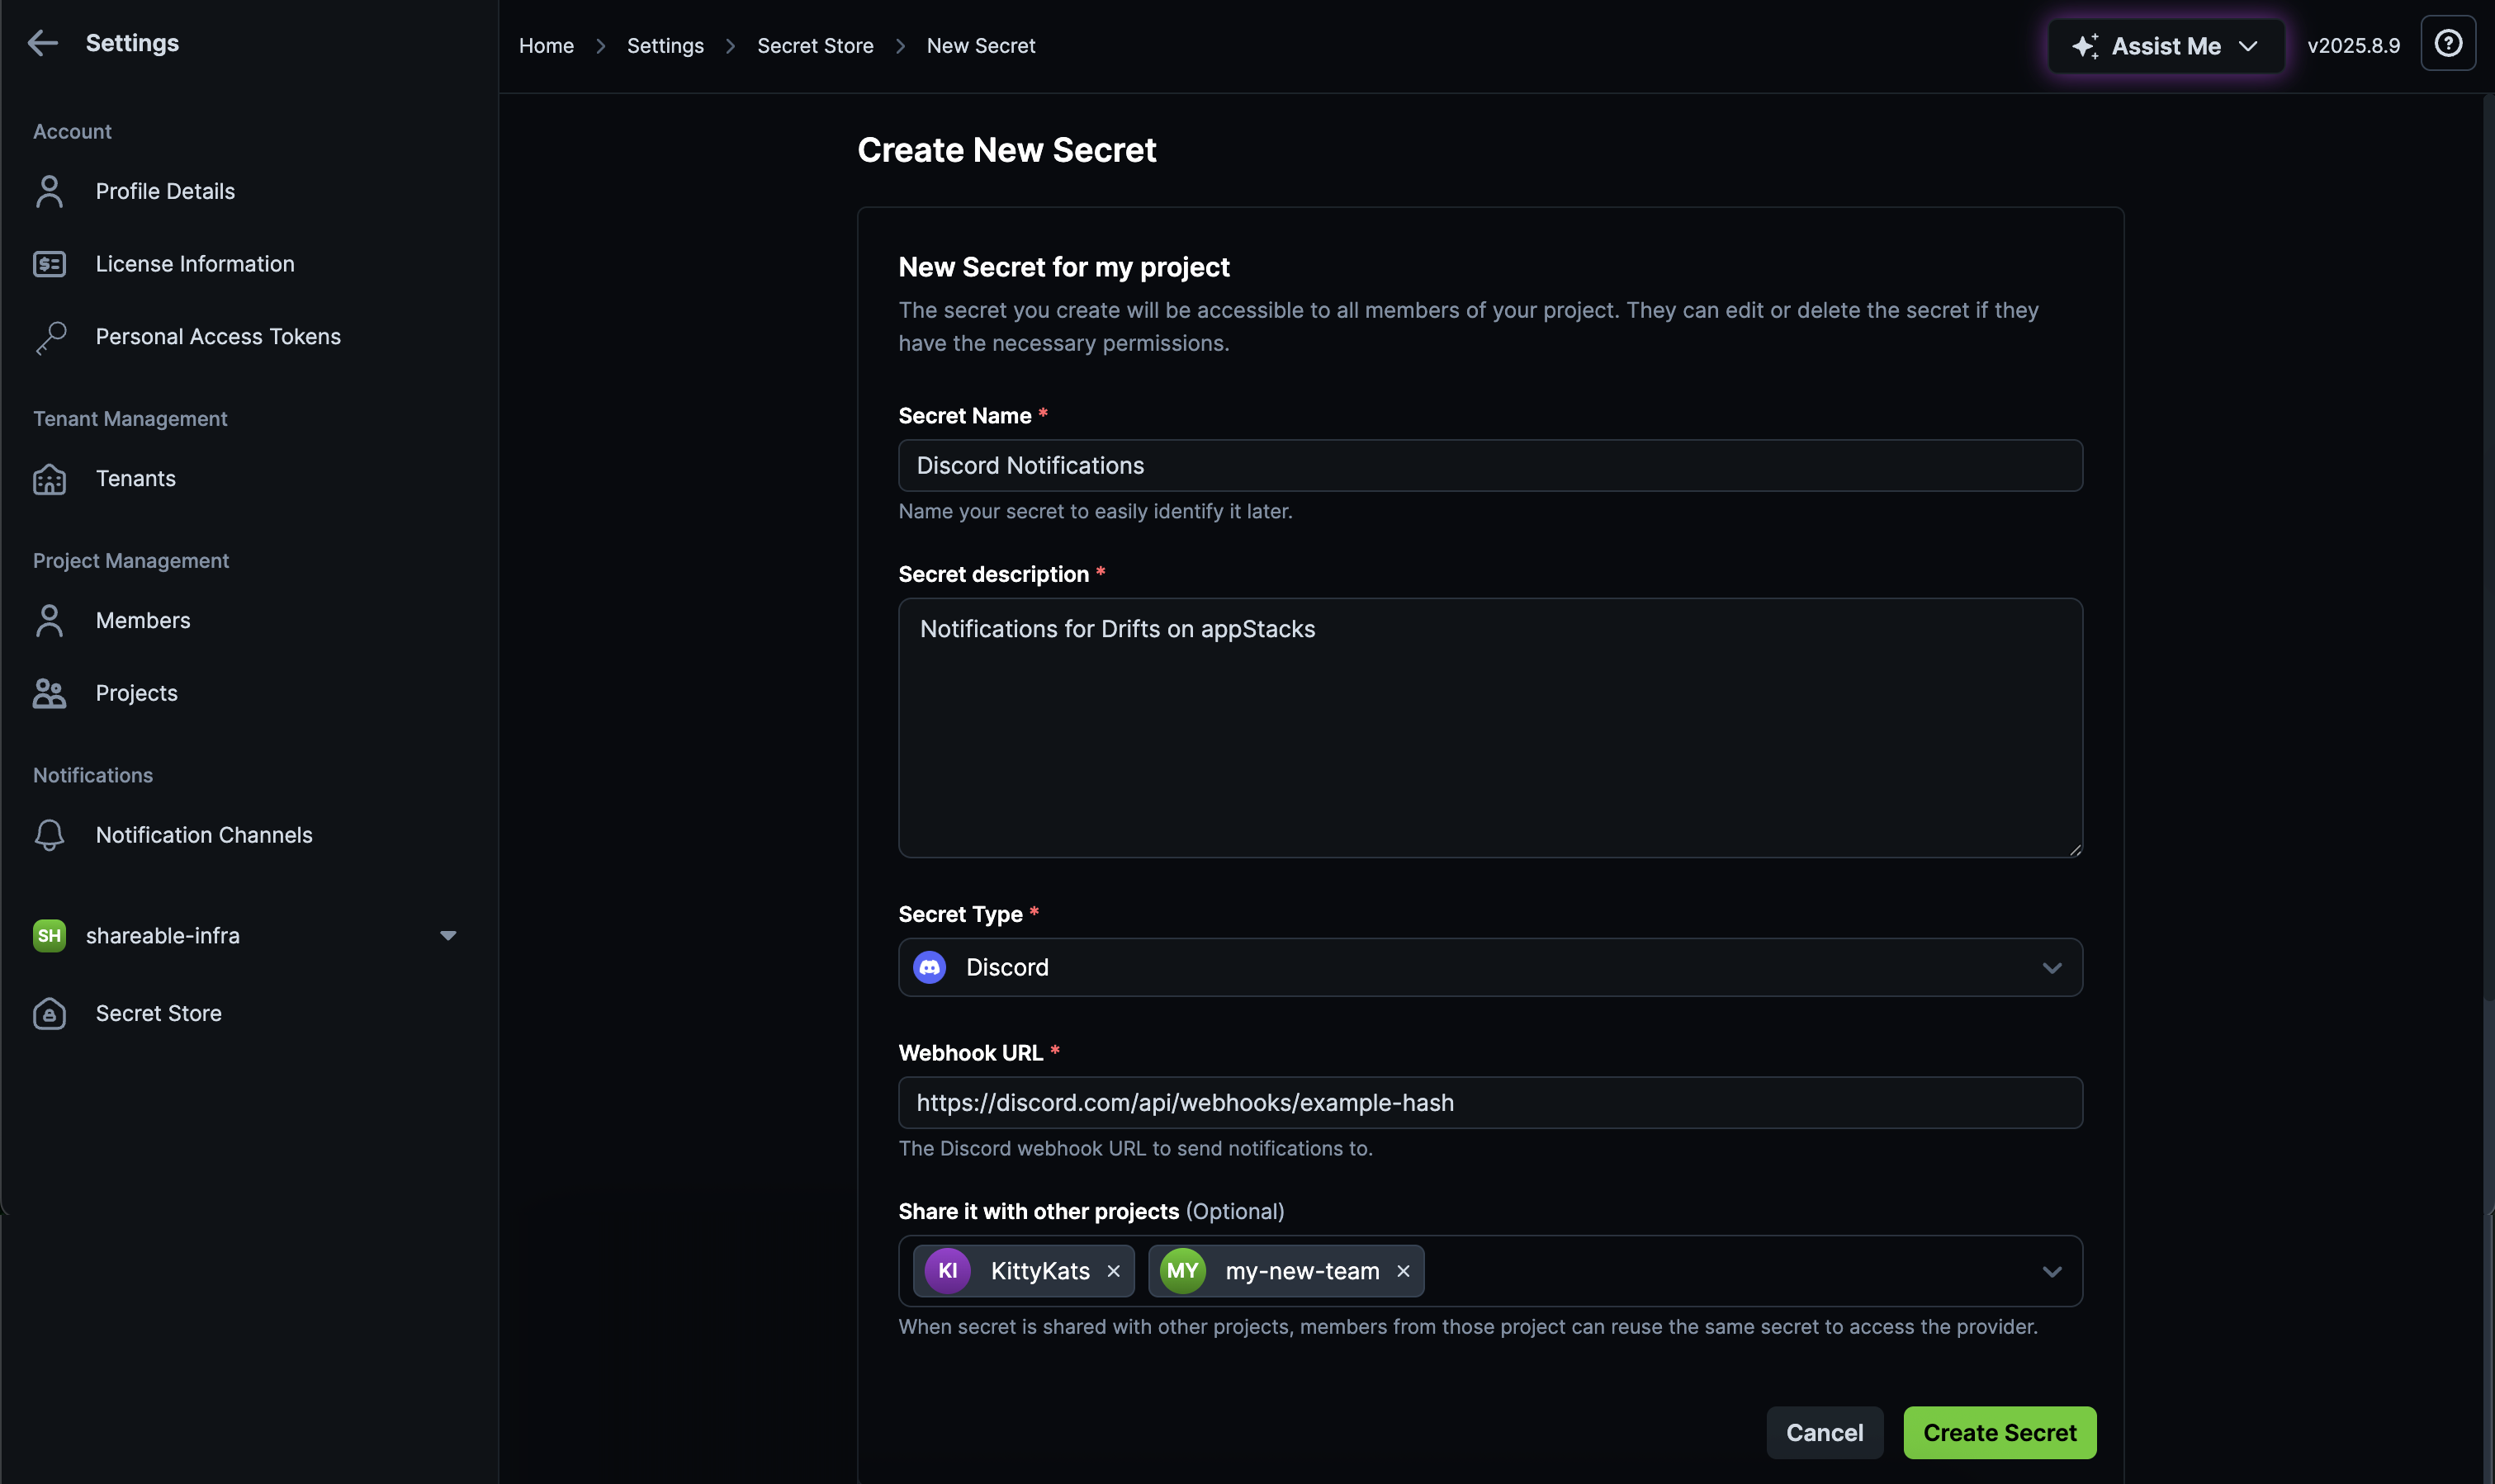
To create an internal secret:
- From the StackGen Home page, navigate to Settings > Secret Store.
- Click + New Secret under the Internal Secrets tab.
- Fill in the required fields:
- Secret Name: Enter a unique name to identify the secret.
- Secret Description: Provide a description of what the secret is used for.
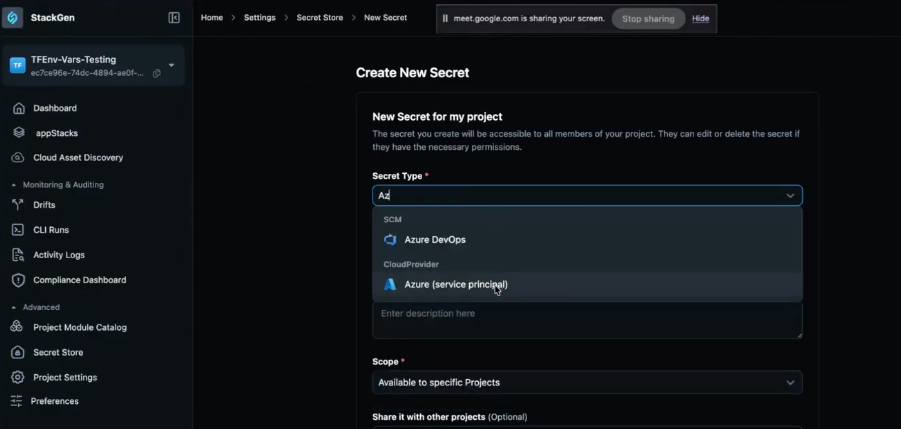
- Secret Type: Select the type of secret (for example, AWS Cloud Provider, GitHub, or CloudProvider: Azure (service principal)).
- Scope: Choose whether the secret is available to specific projects or the entire enterprise.
- Share with other projects (Optional): If sharing, select the projects that should have access to this secret.
- Configure the secret-specific settings based on the selected secret type.
For AWS EKS Cluster secrets, the create form includes a Setup Instructions panel with step-by-step guidance and a sample IAM trust policy JSON so you can wire the secret correctly.
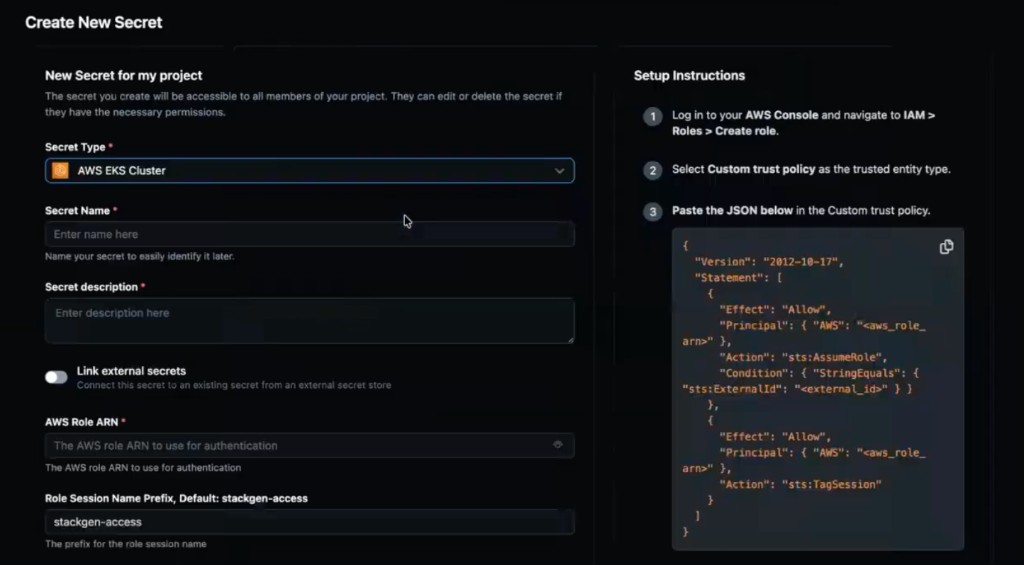
For AWS Cloud Provider secrets, you can use any valid IAM role name when the trust policy is configured correctly for StackGen. A stackgen prefix on the role name is no longer required.
- Click Create Secret.
Use the copy icon in the Internal Secrets table when you need the secret UUID for automation or integrations.

External Secret Store
External secrets are stored in third-party secret managers like AWS Secrets Manager. StackGen connects to these external systems to reference secrets without storing them locally, maintaining a single source of truth.
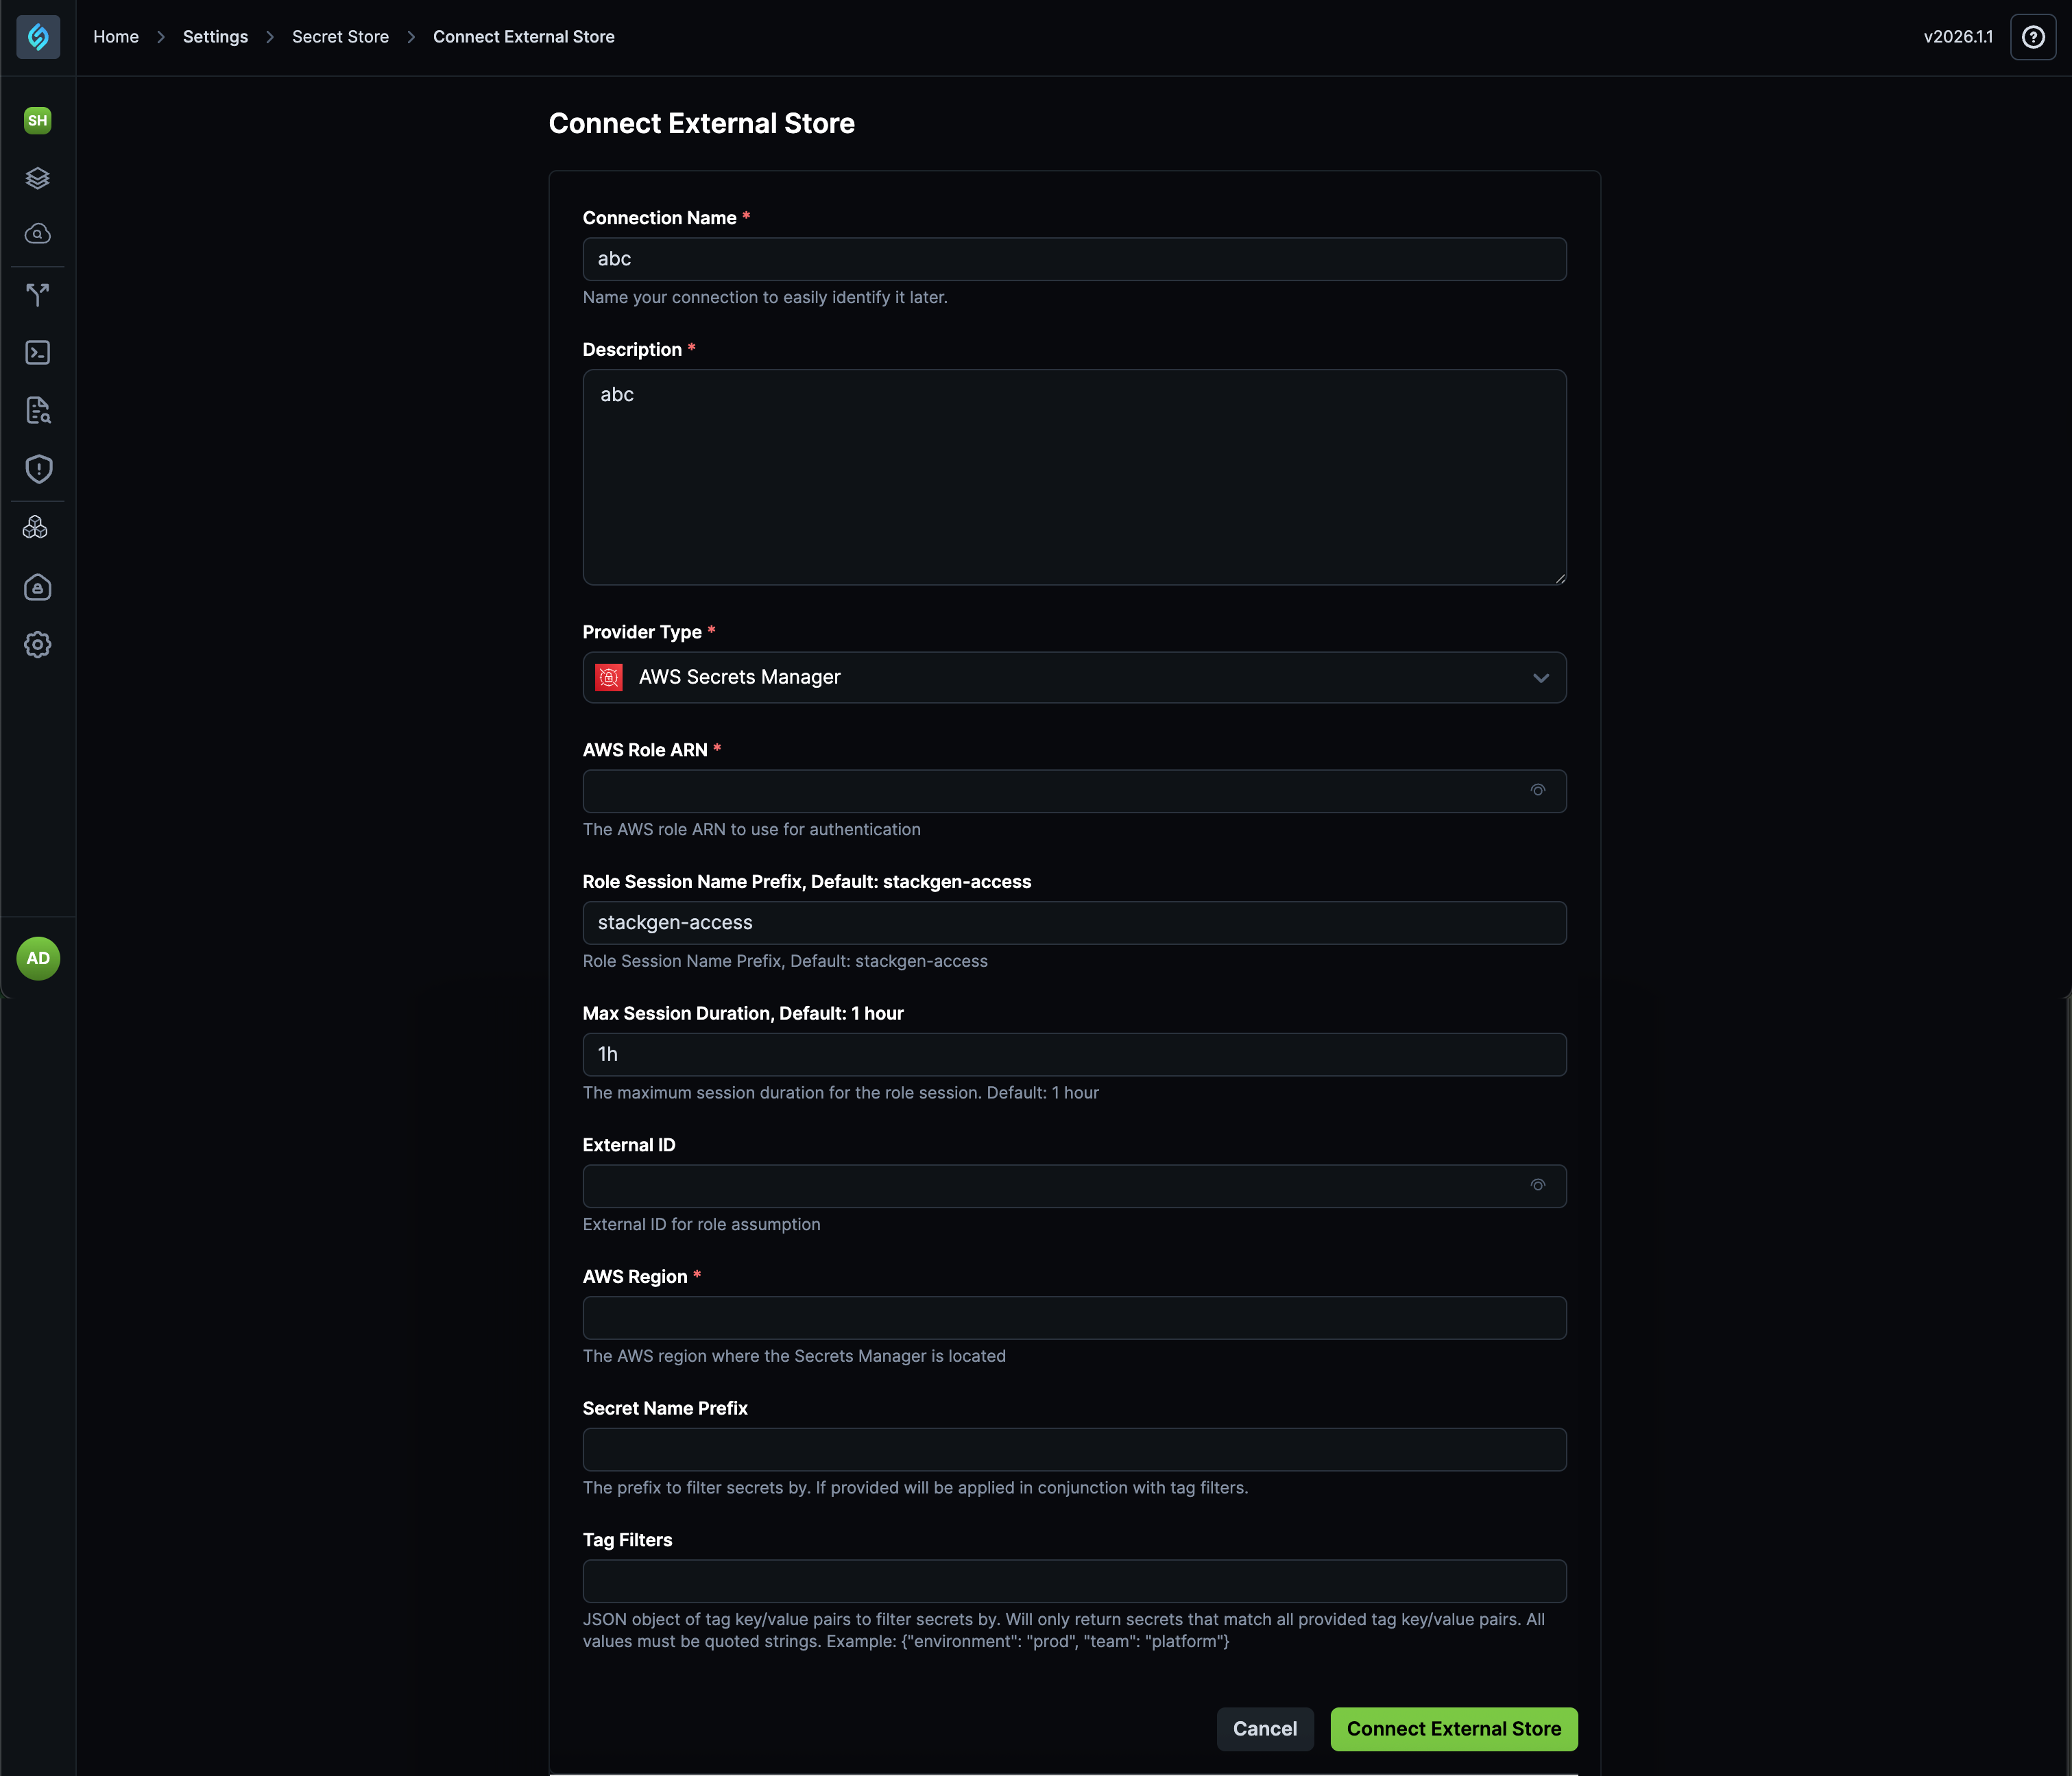
To connect an external secret store:
- From the StackGen Home page, navigate to Settings > Secret Store > External Secrets.
- Click +New External Store.
- Fill in the details:
- Connection Name: Enter a name to identify this external store connection.
- Description: Provide a description of the connection.
- Provider Type: Select AWS Secrets Manager (currently the only supported provider).
- AWS Role ARN: Enter the AWS IAM role ARN to use for authentication.
- Role Session Name Prefix: Enter a prefix for the role session name (default:
stackgen-access). - Max Session Duration: Set the maximum session duration (default: 1 hour).
- External ID (Optional): Enter an external ID for role assumption if required.
- AWS Region: Specify the AWS region where Secrets Manager is located.
- Secret Name Prefix (Optional): Enter a prefix to filter secrets by name.
- Tag Filters (Optional): Provide a JSON object of tag key/value pairs to filter secrets. Example:
{"environment": "prod", "team": "platform"}.
- Click Connect External Store to establish the connection.
Linking External Secrets to Internal Secrets
You can reference an external secret from an external store within an internal secret by enabling the Link external secrets toggle. This allows you to use external secrets in your StackGen workflows while maintaining them in your external secret manager.
To link an external secret to an internal secret:
- Create or edit an internal secret (follow the steps in Internal Secret Store).
- Enable the Link external secrets toggle.
- Select the external store connection you want to link to.
- The secret will now reference the external secret store, allowing you to use secrets from AWS Secrets Manager (or other supported providers) within StackGen without duplicating them.
Secrets will be created under the respective projects you select from the Projects drop-down while creating the secret store. For example, let's say you create a secret within Project A and share it with Project B,C, and D:
- If you navigate to Project B from the Projects drop-down and delete the shared secret via the ellipsis ⋮ icon under the Actions column, the secret will no longer be shared with Project B but will still be available under Project A,C, and D.
- If you delete the shared secret from Project A, it will also be deleted from Projects B, C, and D.